September 2024
M T W T F S S
 1
2345678
9101112131415
16171819202122
23242526272829
30  

Categories

September 2024
M T W T F S S
 1
2345678
9101112131415
16171819202122
23242526272829
30  

Key Commands for nginx

Here are some Key Commands for nginx that I find so usefull.

$ nginx -t * Check if Nginx configuration is ok

$ nginx -s reload * Gracefully reload NGINX processes

$ nginx -V * a like -v, but with more detailed information

$ nginx -T * Dump full NGINX configuration

$ nginx -g * Display nginx help menu

* After config change, test and reload: $ nginx -t && nginx -s reload

Deploying or upgrading Kubernetes


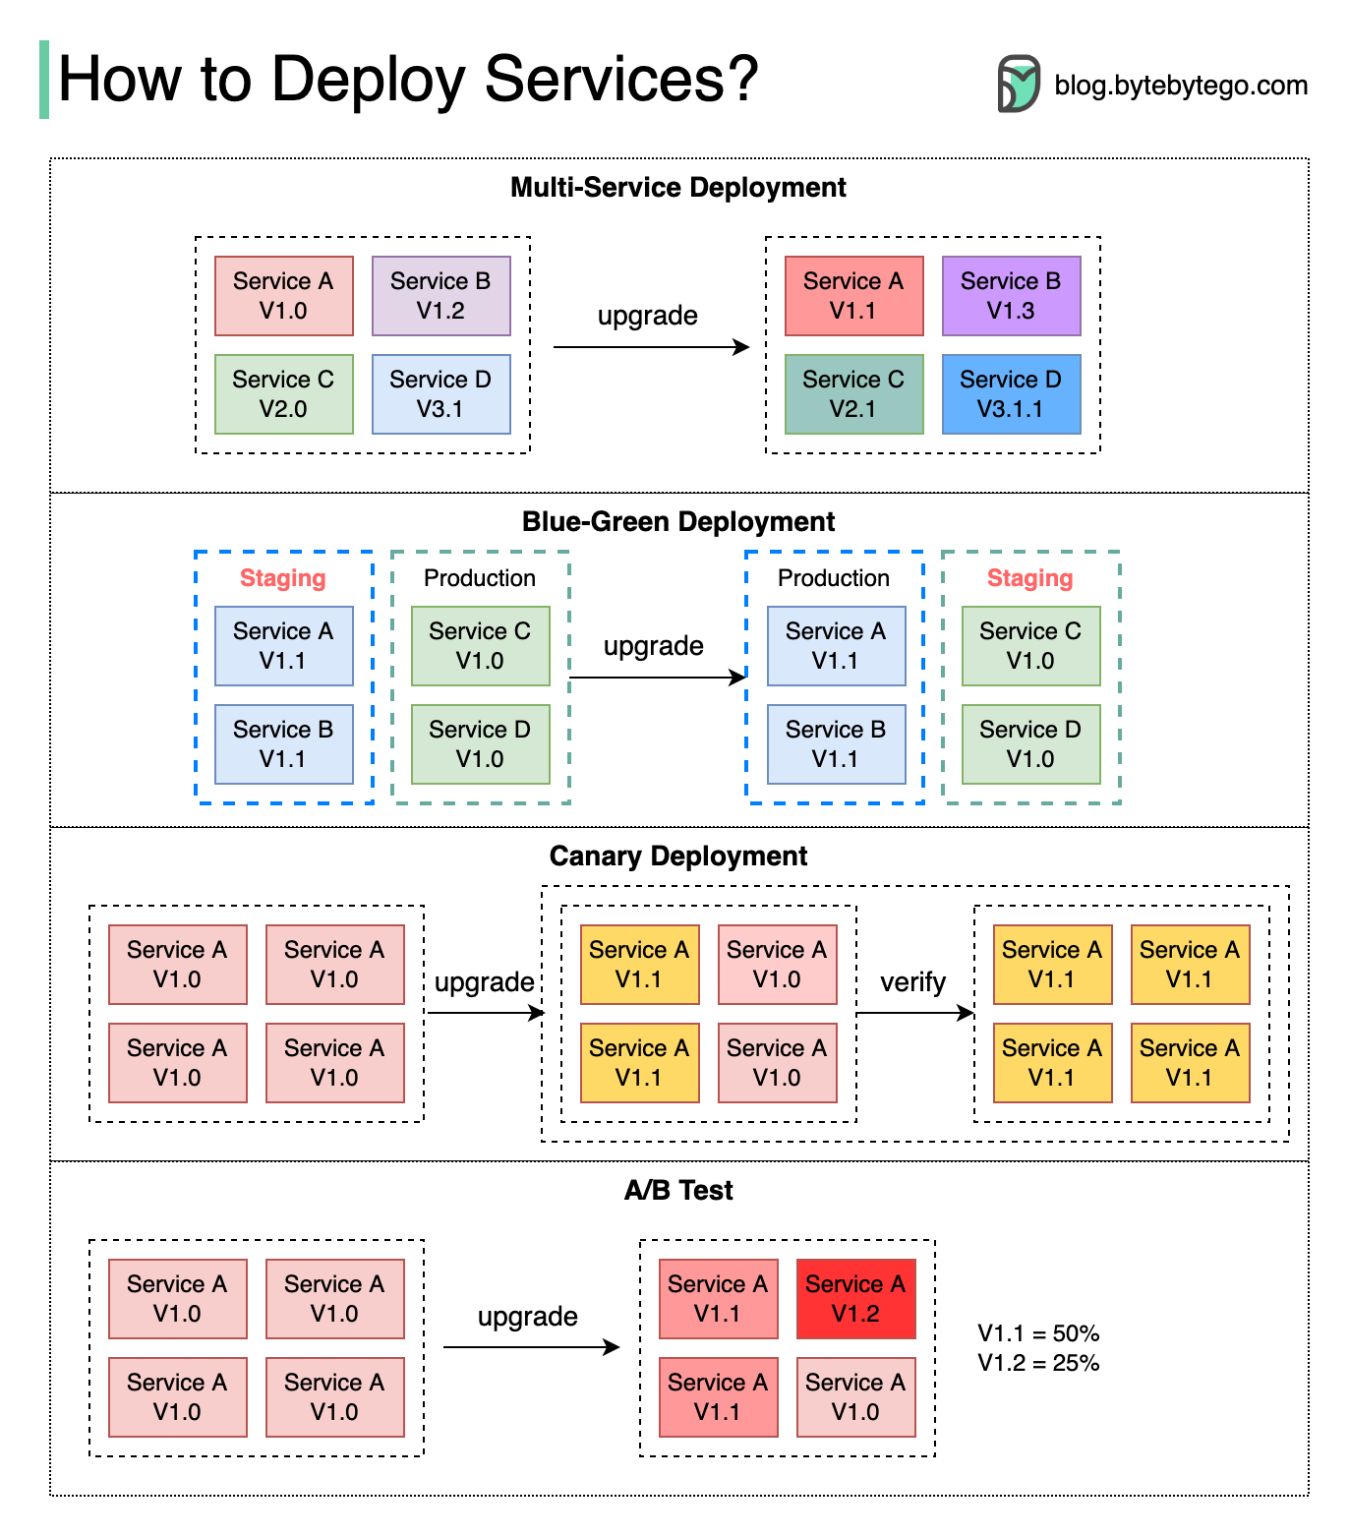
In this model, we deploy new changes to multiple services simultaneously. This approach is easy to implement. But since all the services are upgraded at the same time, it is hard to manage and test dependencies. It’s also hard to rollback safely.


With blue-green deployment, we have two identical environments: one is staging (blue) and the other is production (green). The staging environment is one version ahead of production. Once testing is done in the staging environment, user traffic is switched to the staging environment, and the staging becomes the production. This deployment strategy is simple to perform rollback, but having two identical production quality environments could be expensive.


A canary deployment upgrades services gradually, each time to a subset of users. It is cheaper than blue-green deployment and easy to perform rollback. However, since there is no staging environment, we have to test on production. This process is more complicated because we need to monitor the canary while gradually migrating more and more users away from the old version.


In the A/B test, different versions of services run in production simultaneously. Each version runs an “experiment” for a subset of users. A/B test is a cheap method to test new features in production. We need to control the deployment process in case some features are pushed to users by accident.

No alternative text description for this image

How Kubernetes works

How Kubernetes works

Reference link How Kubernetes works | Cloud Native Computing Foundation (cncf.io)

Enter Kubernetes, a container orchestration system – a way to manage the lifecycle of containerized applications across an entire fleet. It’s a sort of meta-process that grants the ability to automate the deployment and scaling of several containers at once. Several containers running the same application are grouped together. These containers act as replicas, and serve to load balance incoming requests. A container orchestrator, then, supervises these groups, ensuring that they are operating correctly.

Kubernetes architecture
Kubernetes Architecture | LaptrinhX

Kubernetes architecture and concepts tutorial - Kubernetes Administration  for beginners - YouTube

A container orchestrator is essentially an administrator in charge of operating a fleet of containerized applications. If a container needs to be restarted or acquire more resources, the orchestrator takes care of it for you.

That’s a fairly broad outline of how most container orchestrators work. Let’s take a deeper look at all the specific components of Kubernetes that make this happen.

Kubernetes terminology and architecture

Kubernetes introduces a lot of vocabulary to describe how your application is organized. We’ll start from the smallest layer and work our way up.

Pods

A Kubernetes pod is a group of containers, and is the smallest unit that Kubernetes administers. Pods have a single IP address that is applied to every container within the pod. Containers in a pod share the same resources such as memory and storage. This allows the individual Linux containers inside a pod to be treated collectively as a single application, as if all the containerized processes were running together on the same host in more traditional workloads. It’s quite common to have a pod with only a single container, when the application or service is a single process that needs to run. But when things get more complicated, and multiple processes need to work together using the same shared data volumes for correct operation, multi-container pods ease deployment configuration compared to setting up shared resources between containers on your own.

For example, if you were working on an image-processing service that created GIFs, one pod might have several containers working together to resize images. The primary container might be running the non-blocking microservice application taking in requests, and then one or more auxiliary (side-car) containers running batched background processes or cleaning up data artifacts in the storage volume as part of managing overall application performance.

Deployments

Kubernetes deployments define the scale at which you want to run your application by letting you set the details of how you would like pods replicated on your Kubernetes nodes. Deployments describe the number of desired identical pod replicas to run and the preferred update strategy used when updating the deployment. Kubernetes will track pod health, and will remove or add pods as needed to bring your application deployment to the desired state.

Services

The lifetime of an individual pod cannot be relied upon; everything from their IP addresses to their very existence are prone to change. In fact, within the DevOps community, there’s the notion of treating servers as either “pets” or “cattle.” A pet is something you take special care of, whereas cows are viewed as somewhat more expendable. In the same vein, Kubernetes doesn’t treat its pods as unique, long-running instances; if a pod encounters an issue and dies, it’s Kubernetes’ job to replace it so that the application doesn’t experience any downtime.

A service is an abstraction over the pods, and essentially, the only interface the various application consumers interact with. As pods are replaced, their internal names and IPs might change. A service exposes a single machine name or IP address mapped to pods whose underlying names and numbers are unreliable. A service ensures that, to the outside network, everything appears to be unchanged.

Nodes

A Kubernetes node manages and runs pods; it’s the machine (whether virtualized or physical) that performs the given work. Just as pods collect individual containers that operate together, a node collects entire pods that function together. When you’re operating at scale, you want to be able to hand work over to a node whose pods are free to take it.

The Kubernetes control plane

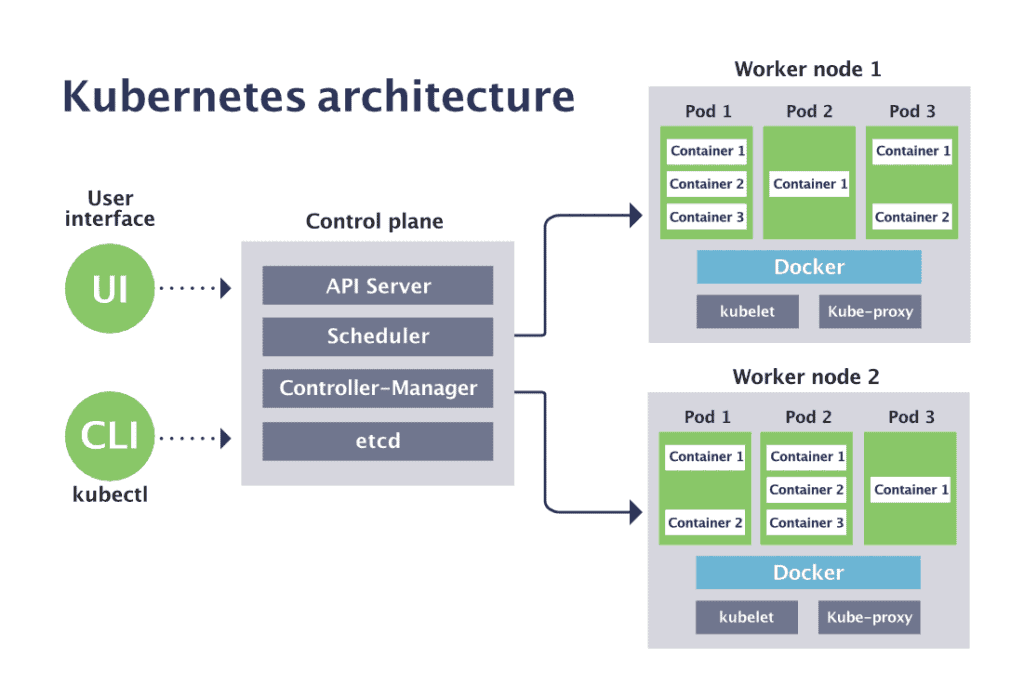
The Kubernetes control plane is the main entry point for administrators and users to manage the various nodes. Operations are issued to it either through HTTP calls or connecting to the machine and running command-line scripts. As the name implies, it controls how Kubernetes interacts with your applications.

Cluster

A cluster is all of the above components put together as a single unit.

Kubernetes components

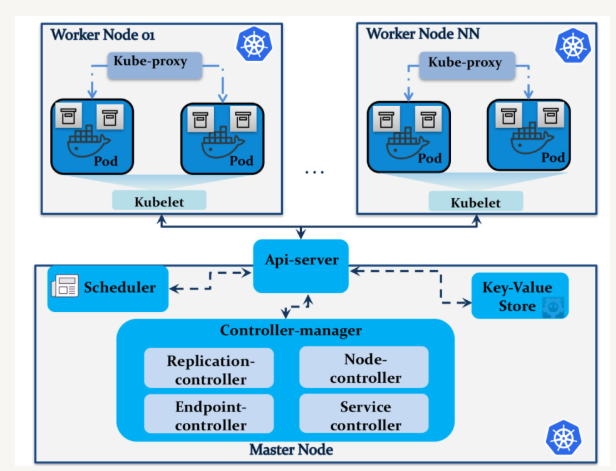
With a general idea of how Kubernetes is assembled, it’s time to take a look at the various software components that make sure everything runs smoothly. Both the control plane and individual worker nodes have three main components each.

Control Plane

API Server

The API server exposes a REST interface to the Kubernetes cluster. All operations against pods, services, and so forth, are executed programmatically by communicating with the endpoints provided by it.

Scheduler

The scheduler is responsible for assigning work to the various nodes. It keeps watch over the resource capacity and ensures that a worker node’s performance is within an appropriate threshold.

Controller manager

The controller-manager is responsible for making sure that the shared state of the cluster is operating as expected. More accurately, the controller manager oversees various controllers which respond to events (e.g., if a node goes down).

Worker node components

Kubelet

A Kubelet tracks the state of a pod to ensure that all the containers are running. It provides a heartbeat message every few seconds to the control plane. If a replication controller does not receive that message, the node is marked as unhealthy.

Kube proxy

The Kube proxy routes traffic coming into a node from the service. It forwards requests for work to the correct containers.

etcd

etcd

is a distributed key-value store that Kubernetes uses to share information about the overall state of a cluster. Additionally, nodes can refer to the global configuration data stored there to set themselves up whenever they are regenerated.

Install Docker CE on Rocky Linux 8

Installing Docker CE on Rocky Linux 8

Docker has a dedicated CentOS repository that we can apply to Rocky Linux. So, the ideal would be to add it to the system and install it from there.

First access your server via SSH or, if you are using Rocky Linux from the desktop, open a terminal.

Now install the yum-utils package.

sudo dnf install yum-utils

With this package installed, we can add the Docker repository.

sudo yum-config-manager --add-repo https://download.docker.com/linux/centos/docker-ce.repo

Output:

Adding repo from: https://download.docker.com/linux/centos/docker-ce.repo

If you want to check if the repository has been successfully added, you can run

sudo dnf repolist

sudo dnf install docker-ce docker-ce-cli containerd.io

With this process, Docker is already installed, but its service is not started.

To start the Docker service, run

sudo systemctl start docker

It is convenient that the service starts with the system, to do this

sudo systemctl enable docker

Output:

Created symlink /etc/systemd/system/multi-user.target.wants/docker.service ? /usr/lib/systemd/system/system/docker.service

Finally, you can check the status of the service

sudo systemctl status docker

In conclusion, Docker is installed correctly.

First steps with Docker CE on Rocky Linux

Using Docker requires root permissions. This can be a problem for many people, so a real option would be to add the user to the docker group.

To complete this, run the following command

sudo usermod -aG docker $USER

Now, you can run Docker and for this you can use the test image.

docker run hello-world

Fix rpmdb bdb0113

mkdir /var/lib/rpm/backup
cp -a /var/lib/rpm/__db* /var/lib/rpm/backup/
rm -f /var/lib/rpm/__db.[0-9][0-9]*
rpm --quiet -qa
rpm --rebuilddb
yum clean all

How to Install Docker CE and Docker-Compose on CentOS 8

Docker is a set of Platform as a Service (PaaS) products that uses operating system level virtualizations to deliver software in the form of containers. Docker CE (Community Edition) is the strip down version of Docker EE (Enterprise Edition). Docker CE is free and open source and distributed under Apache License 2.0.

In Red Hat Enterprise Linux (RHEL) 8 / CentOS 8, Support of Docker has been removed by the vendor. Whereas a new containerization platform libpod (Podman’s Container Management Library) has been introduced inplace of Docker.

However, we can still install Docker and it’s dependencies on CentOS 8 / RHEL 8 from third party yum repositories.

In this article, we are installing Docker CE and docker-compose on CentOS 8.

Prerequisites

  • You must have Alibaba Cloud Elastic Compute Service (ECS) activated and verified your valid payment method. If you are a new user, you can get $450 – $1300 worth in Alibaba Cloud credits for your new account. If you don’t know how to setup your ECS instance, you can refer to this tutorial or quick-start guide.
  • domain name registered from Alibaba Cloud. If you have already registered a domain from Alibaba Cloud or any other host, you can update its domain nameserver records.
  • Domain name must be pointed to your Alibaba Cloud ECS’s IP address
  • Access to VNC console in your Alibaba Cloud or SSH client installed in your PC
  • Set up your server’s hostname and create a user with root privileges.

Environment Specification

We have configured a CentOS 8 virtual machine with following specifications.

  • CPU – 3.4 Ghz (2 cores)
  • Memory – 2 GB
  • Storage – 40 GB
  • Operating System – CentOS 8.0
  • Hostname – docker-01.example.com
  • IP Address – 192.168.116.6/24

Adding Docker CE yum Repository on CentOS 8:

Connect with docker-01.example.com using ssh as root user.

Docker CE is available to download from Docker’s Official Website However, we can also install it from Docker CE yum repository.

Add Docker CE yum repository using dnf command.

[root@docker-01 ~]# dnf config-manager --add-repo=https://download.docker.com/linux/centos/docker-ce.repo
Adding repo from: https://download.docker.com/linux/centos/docker-ce.repo

Build cache for Docker yum repository.

[root@docker-01 ~]# dnf makecache
CentOS-8 - AppStream                            7.0 kB/s | 4.3 kB     00:00
CentOS-8 - Base                                 2.2 kB/s | 3.9 kB     00:01
CentOS-8 - Extras                               1.7 kB/s | 1.5 kB     00:00
Docker CE Stable - x86_64                       6.5 kB/s |  21 kB     00:03
Metadata cache created.

Installing Docker CE on CentOS 8:

After addition of Docker CE yum repository, we can now easily install Docker CE on CentOS 8 by using a dnf command.

Docker CE requires containerd.io-1.2.2-3 (or later) package, which is blocked in CentOS 8. Therefore, we have to use an earlier version of containerd.io package.

Install docker-ce with an earlier version of containerd.io using following command.

[root@docker-01 ~]# dnf -y install --nobest docker-ce
Last metadata expiration check: 0:21:14 ago on Wed 25 Dec 2019 10:25:37 PM PKT.
Dependencies resolved.

 Problem: package docker-ce-3:19.03.5-3.el7.x86_64 requires containerd.io >= 1.2.2-3, but none of the providers can be installed
  - cannot install the best candidate for the job
  - package containerd.io-1.2.10-3.2.el7.x86_64 is excluded
  - package containerd.io-1.2.2-3.3.el7.x86_64 is excluded
  - package containerd.io-1.2.2-3.el7.x86_64 is excluded
  - package containerd.io-1.2.4-3.1.el7.x86_64 is excluded
  - package containerd.io-1.2.5-3.1.el7.x86_64 is excluded
  - package containerd.io-1.2.6-3.3.el7.x86_64 is excluded
================================================================================
 Package                      Arch   Version             Repository        Size
================================================================================
Installing:
 docker-ce                    x86_64 3:18.09.1-3.el7     docker-ce-stable  19 M
Installing dependencies:
 container-selinux            noarch 2:2.94-1.git1e99f1d.module_el8.0.0+58+91b614e7
                                                         AppStream         43 k
 checkpolicy                  x86_64 2.8-2.el8           BaseOS           338 k
 libcgroup                    x86_64 0.41-19.el8         BaseOS            70 k
 policycoreutils-python-utils noarch 2.8-16.1.el8        BaseOS           228 k
 python3-audit                x86_64 3.0-0.10.20180831git0047a6c.el8
                                                         BaseOS            85 k
 python3-libsemanage          x86_64 2.8-5.el8           BaseOS           127 k
 python3-policycoreutils      noarch 2.8-16.1.el8        BaseOS           2.2 M
 python3-setools              x86_64 4.2.0-2.el8         BaseOS           598 k
 containerd.io                x86_64 1.2.0-3.el7         docker-ce-stable  22 M
 docker-ce-cli                x86_64 1:19.03.5-3.el7     docker-ce-stable  39 M
Enabling module streams:
 container-tools                     rhel8
Skipping packages with broken dependencies:
 docker-ce                    x86_64 3:19.03.5-3.el7     docker-ce-stable  24 M

Transaction Summary
================================================================================
Install  11 Packages
Skip      1 Package

Total download size: 84 M
Installed size: 348 M
Downloading Packages:
(1/11): libcgroup-0.41-19.el8.x86_64.rpm        182 kB/s |  70 kB     00:00
(2/11): container-selinux-2.94-1.git1e99f1d.mod 108 kB/s |  43 kB     00:00
(3/11): python3-audit-3.0-0.10.20180831git0047a 102 kB/s |  85 kB     00:00
(4/11): policycoreutils-python-utils-2.8-16.1.e 132 kB/s | 228 kB     00:01
(5/11): python3-libsemanage-2.8-5.el8.x86_64.rp 106 kB/s | 127 kB     00:01
(6/11): checkpolicy-2.8-2.el8.x86_64.rpm        126 kB/s | 338 kB     00:02
(7/11): python3-setools-4.2.0-2.el8.x86_64.rpm  113 kB/s | 598 kB     00:05
(8/11): python3-policycoreutils-2.8-16.1.el8.no 109 kB/s | 2.2 MB     00:20
(9/11): docker-ce-18.09.1-3.el7.x86_64.rpm       75 kB/s |  19 MB     04:16
(10/11): containerd.io-1.2.0-3.el7.x86_64.rpm    80 kB/s |  22 MB     04:41
(11/11): docker-ce-cli-19.03.5-3.el7.x86_64.rpm 122 kB/s |  39 MB     05:31
--------------------------------------------------------------------------------
Total                                           240 kB/s |  84 MB     05:58
warning: /var/cache/dnf/docker-ce-stable-091d8a9c23201250/packages/containerd.io-1.2.0-3.el7.x86_64.rpm: Header V4 RSA/SHA512 Signature, key ID 621e9f35: NOKEY
Docker CE Stable - x86_64                       1.5 kB/s | 1.6 kB     00:01
Importing GPG key 0x621E9F35:
 Userid     : "Docker Release (CE rpm) <docker@docker.com>"
 Fingerprint: 060A 61C5 1B55 8A7F 742B 77AA C52F EB6B 621E 9F35
 From       : https://download.docker.com/linux/centos/gpg
Key imported successfully
Running transaction check
Transaction check succeeded.
Running transaction test
Transaction test succeeded.
Running transaction
  Preparing        :                                                        1/1
  Installing       : docker-ce-cli-1:19.03.5-3.el7.x86_64                  1/11
  Running scriptlet: docker-ce-cli-1:19.03.5-3.el7.x86_64                  1/11
  Installing       : containerd.io-1.2.0-3.el7.x86_64                      2/11
  Running scriptlet: containerd.io-1.2.0-3.el7.x86_64                      2/11
  Installing       : python3-setools-4.2.0-2.el8.x86_64                    3/11
  Installing       : python3-libsemanage-2.8-5.el8.x86_64                  4/11
  Installing       : python3-audit-3.0-0.10.20180831git0047a6c.el8.x86_    5/11
  Running scriptlet: libcgroup-0.41-19.el8.x86_64                          6/11
  Installing       : libcgroup-0.41-19.el8.x86_64                          6/11
  Running scriptlet: libcgroup-0.41-19.el8.x86_64                          6/11
  Installing       : checkpolicy-2.8-2.el8.x86_64                          7/11
  Installing       : python3-policycoreutils-2.8-16.1.el8.noarch           8/11
  Installing       : policycoreutils-python-utils-2.8-16.1.el8.noarch      9/11
  Installing       : container-selinux-2:2.94-1.git1e99f1d.module_el8.0   10/11
  Running scriptlet: container-selinux-2:2.94-1.git1e99f1d.module_el8.0   10/11
  Running scriptlet: docker-ce-3:18.09.1-3.el7.x86_64                     11/11
  Installing       : docker-ce-3:18.09.1-3.el7.x86_64                     11/11
  Running scriptlet: docker-ce-3:18.09.1-3.el7.x86_64                     11/11
  Verifying        : container-selinux-2:2.94-1.git1e99f1d.module_el8.0    1/11
  Verifying        : checkpolicy-2.8-2.el8.x86_64                          2/11
  Verifying        : libcgroup-0.41-19.el8.x86_64                          3/11
  Verifying        : policycoreutils-python-utils-2.8-16.1.el8.noarch      4/11
  Verifying        : python3-audit-3.0-0.10.20180831git0047a6c.el8.x86_    5/11
  Verifying        : python3-libsemanage-2.8-5.el8.x86_64                  6/11
  Verifying        : python3-policycoreutils-2.8-16.1.el8.noarch           7/11
  Verifying        : python3-setools-4.2.0-2.el8.x86_64                    8/11
  Verifying        : containerd.io-1.2.0-3.el7.x86_64                      9/11
  Verifying        : docker-ce-3:18.09.1-3.el7.x86_64                     10/11
  Verifying        : docker-ce-cli-1:19.03.5-3.el7.x86_64                 11/11

Installed:
  docker-ce-3:18.09.1-3.el7.x86_64
  container-selinux-2:2.94-1.git1e99f1d.module_el8.0.0+58+91b614e7.noarch
  checkpolicy-2.8-2.el8.x86_64
  libcgroup-0.41-19.el8.x86_64
  policycoreutils-python-utils-2.8-16.1.el8.noarch
  python3-audit-3.0-0.10.20180831git0047a6c.el8.x86_64
  python3-libsemanage-2.8-5.el8.x86_64
  python3-policycoreutils-2.8-16.1.el8.noarch
  python3-setools-4.2.0-2.el8.x86_64
  containerd.io-1.2.0-3.el7.x86_64
  docker-ce-cli-1:19.03.5-3.el7.x86_64

Skipped:
  docker-ce-3:19.03.5-3.el7.x86_64

Complete!

Enable and start Docker service.

[root@docker-01 ~]# systemctl enable --now docker.service
Created symlink /etc/systemd/system/multi-user.target.wants/docker.service â /usr/lib/systemd/system/docker.service.

Check status of Docker service.

[root@docker-01 ~]# systemctl status docker.service
â docker.service - Docker Application Container Engine
   Loaded: loaded (/usr/lib/systemd/system/docker.service; enabled; vendor pres>
   Active: active (running) since Wed 2019-12-25 22:56:45 PKT; 30s ago
     Docs: https://docs.docker.com
 Main PID: 3139 (dockerd)
    Tasks: 17
   Memory: 66.9M
   CGroup: /system.slice/docker.service
           ââ3139 /usr/bin/dockerd -H fd://
           ââ3148 containerd --config /var/run/docker/containerd/containerd.tom>

Dec 25 22:56:43 docker-01.recipes.com dockerd[3139]: time="2019-12-25T22:56:43.>
Dec 25 22:56:44 docker-01.recipes.com dockerd[3139]: time="2019-12-25T22:56:44.>
Dec 25 22:56:45 docker-01.recipes.com dockerd[3139]: time="2019-12-25T22:56:45.>
Dec 25 22:56:45 docker-01.recipes.com systemd[1]: Started Docker Application Co>

Check Docker version.

[root@docker-01 ~]# docker version
Client: Docker Engine - Community
 Version:           19.03.5
 API version:       1.39 (downgraded from 1.40)
 Go version:        go1.12.12
 Git commit:        633a0ea
 Built:             Wed Nov 13 07:25:41 2019
 OS/Arch:           linux/amd64
 Experimental:      false

Server: Docker Engine - Community
 Engine:
  Version:          18.09.1
  API version:      1.39 (minimum version 1.12)
  Go version:       go1.10.6
  Git commit:       4c52b90
  Built:            Wed Jan  9 19:06:30 2019
  OS/Arch:          linux/amd64
  Experimental:     false

Docker CE has been installed on CentOS 8.

Create a Container using Docker in CentOS 8:

Let’s put Docker into action by creating a simple container.

For this purpose, we are using official image of Alpine Linux from Docker Hub.

[root@docker-01 ~]# docker search alpine --filter is-official=true
NAME                DESCRIPTION                                     STARS               OFFICIAL            AUTOMATED
alpine              A minimal Docker image based on Alpine Linux⦠  5945                [OK]

Pull Alpine Linux image from Docker Hub.

[root@docker-01 ~]# docker pull alpine
Using default tag: latest
latest: Pulling from library/alpine
e6b0cf9c0882: Pull complete
Digest: sha256:2171658620155679240babee0a7714f6509fae66898db422ad803b951257db78
Status: Downloaded newer image for alpine:latest
docker.io/library/alpine:latest

List locally available docker images.

[root@docker-01 ~]# docker images
REPOSITORY          TAG                 IMAGE ID            CREATED             SIZE
alpine              latest              cc0abc535e36        23 hours ago        5.59MB

Create and run a container using Alpine Linux image.

[root@docker-01 ~]# docker run -it --rm alpine /bin/sh
/ # cat /etc/os-release
NAME="Alpine Linux"
ID=alpine
VERSION_ID=3.11.2
PRETTY_NAME="Alpine Linux v3.11"
HOME_URL="https://alpinelinux.org/"
BUG_REPORT_URL="https://bugs.alpinelinux.org/"
/ # uname -a
Linux c0089c037e24 4.18.0-80.11.2.el8_0.x86_64 #1 SMP Tue Sep 24 11:32:19 UTC 2019 x86_64 Linux
/ # exit

Installing Docker-compose on CentOS 8:

Additionally, we are installing docker-compose on our CentOS 8 server, so we can create and run multiple containers as a single service.

Download docker-compose package from GitHub.

[root@docker-01 ~]# curl -L https://github.com/docker/compose/releases/download/1.25.1-rc1/docker-compose-`uname -s`-`uname -m` -o /usr/local/bin/docker-compose
  % Total    % Received % Xferd  Average Speed   Time    Time     Time  Current
                                 Dload  Upload   Total   Spent    Left  Speed
100   617    0   617    0     0    546      0 --:--:--  0:00:01 --:--:--   546
100 16.2M  100 16.2M    0     0   184k      0  0:01:29  0:01:29 --:--:--  276k

Grant execute permissions to docker-compose command.

[root@docker-01 ~]# chmod +x /usr/local/bin/docker-compose

Check docker-compose version.

[root@docker-01 ~]# docker-compose version
docker-compose version 1.25.1-rc1, build d92e9bee
docker-py version: 4.1.0
CPython version: 3.7.4
OpenSSL version: OpenSSL 1.1.0l  10 Sep 2019

We have successfully installed Docker CE and Docker-Compose on CentOS 8. We have only explored the installation of Docker CE here

Dnsmasq Centos7

One could only guess that the rationale for lack of DNS caching in RHEL is the arguable efficiency for those systems which aren’t network connected or simply don’t need to make any DNS lookups.

There are of course such cases where you don’t need (many) DNS resolutions. I can think of:

  • a dedicated DB server
  • a private server where all hosts are listed in the hosts file

Those systems will likely issue zero to none DNS lookups while running, and DNS cache isn’t really a thing for them.

But for the most intents of running either a desktop or server RHEL machines, you will absolutely benefit from a DNS cache.

Enabling DNS cache in RHEL 7 and 8 is easy thanks to dnsmasq integration of NetworkManager.

The dnsmasq is a very lightweight caching DNS forwarder which runs great even on the tiniest hardware like your very own home router.

I won’t torture you with long instructions on how to enable the DNS cache. It’s really quick and goes down to:

yum -y install dnsmasq

cat << 'EOF' | sudo tee /etc/NetworkManager/conf.d/dns.conf 
[main]
dns=dnsmasq
EOF

systemctl reload NetworkManager

You have just made your machine already faster by running these.

For more details and fine-tuning, read on.

NetworkManager and dnsmasq

Let’s explain what happened when we ran the above commands to enable DNS caching.

In the first bit, we have installed the very essential of DNS caching – dnsmasq program.

Then we write out a file, /etc/NetworkManager/conf.d/dns.conf, with contents telling NetworkManager to enable and use its dnsmasq plugin. Then we reload NetworkManager configuration to apply our changes.

This, in turn, starts a private instance of dnsmasq program, which is bound to the loopback interface, 127.0.0.1 and listening on standard DNS port, 53.

It doesn’t end there. NetworkManager now updated /etc/resolv.conf and put nameserver 127.0.0.1 so that the whole operating system will perform DNS lookups against its dnsmasq instance.

The dnsmasq itself will use whatever nameservers you had setup in NetworkManager explicitly, or the ones provided by DHCP requests.

Very clean and beautiful integration.

Verify dnsmasq is working

Simply perform a DNS lookup using dig, against 127.0.0.1

# yum -y install bind-utils
dig +short example.com @127.0.0.1

If the output looks like a valid IP address or a list of IP addresses, then dnsmasq is working OK.

You can also check that DNS caching is working. Perform a resolution against another domain by running the following command twice:

time getent hosts foo.example.com

Observe real timing in the output reduced for the subsequent queries. E.g. first request yields:

real   0m0.048s
user   0m0.006s
sys    0m0.006s

Subsequent requests yield:

real   0m0.009s
user   0m0.006s
sys    0m0.002s

See what kind of DNS requests your system makes

To see what DNS request your system makes, you can temporarily enable logging of queries. Note that this will clear DNS cache because dnsmasq will be restarted:

echo log-queries | sudo tee -a /etc/NetworkManager/dnsmasq.d/log.conf
sudo systemctl reload NetworkManager

You can then tail or less the /var/log/messages file which will have information of requests being made. Example, on the web server that is using PaperTrail’s remote_syslog:

dnsmasq[20802]: forwarded logs6.papertrailapp.com to 2606:4700:4700::1001
dnsmasq[20802]: reply logs6.papertrailapp.com is 169.46.82.182
dnsmasq[20802]: reply logs6.papertrailapp.com is 169.46.82.183
dnsmasq[20802]: reply logs6.papertrailapp.com is 169.46.82.184
dnsmasq[20802]: reply logs6.papertrailapp.com is 169.46.82.185

This approach may be used for finding what external sites your server communicates with.

Once you’re done, don’t forget to turn off the logging:

sudo rm /etc/NetworkManager/dnsmasq.d/log.conf
sudo systemctl reload NetworkManager

How well is dnsmasq doing on your system

The dnsmasq manpage has this to say:

When it receives a SIGUSR1, dnsmasq writes statistics to the system log. It writes the cache size, the number of names which have had to removed from the cache before they expired in order to
make room for new names and the total number of names that have been inserted into the cache. The number of cache hits and misses and the number of authoritative queries answered are also given.

So we can collect DNS query stats easily:

sudo pkill --signal USR1 dnsmasq && sudo tail /var/log/messages | grep dnsmasq

The output may include, for example:

dnsmasq[31949]: cache size 400, 0/60 cache insertions re-used unexpired cache entries.
queries forwarded 30, queries answered locally 60

The 0 in 0/60 stands for “zero cache evictions”. So this number indicates that cache size is adequate. It should be as low as possible.
If that number is high, it means that cache size maybe not large enough.

We also see that 30 DNS lookups were forwarded over to upstream nameservers (misses), while 60 were satisfied directly by cache (hits).

Gathering stats like this will work well in case you only have one instance of dnsmasq. Sometimes you have more than one (e.g. libvirt may run one of its own).

It is more reliable to use the statistical information of dnsmasq that is exposed, not surprisingly, via DNS ???? The commands:

dig +short chaos txt hits.bind
dig +short chaos txt misses.bind

… give you hits and misses, respectively.

With some command line magic, you can easily calculate your DNS cache hit-ratio:

# yum -y install bc
echo "scale=2; $(dig +short chaos txt hits.bind)*100/($(dig +short chaos txt hits.bind)+$(dig +short chaos txt misses.bind))" | \
  sed 's@"@@g' | bc

The output is a percentage of DNS requests that were satisfied by DNS cache, e.g.: 80.95%.

Tuning the cache size

The default cache size of dnsmasq instance that is run by Networkmanager is 400.
This is a decent default for web servers.

For a desktop machine, you may want to increase it by large. This will assist with much less home router strain and faster network experience, especially if you’re a Chrome user. This browser does DNS caching of its own, but only as long as 1 minute – the issue that is discarded as a “feature”.

So to set DNS cache size to 20k, run:

echo cache-size=20000 | sudo tee -a /etc/NetworkManager/dnsmasq.d/cache.conf
sudo systemctl reload NetworkManager

dnsmasq and your desktop

To expand the topic of the desktop use of dnsmasq, you can also leverage it to block tracking scripts and for speeding up your browsing experience:

sudo curl https://raw.githubusercontent.com/aghorler/lightweight-dnsmasq-blocklist/master/list.txt \
  --output /etc/NetworkManager/dnsmasq.d/blocklist.conf
sudo systemctl reload NetworkManager

Finally, you may also want to improve the DNS speed by ensuring minimum TTL for DNS records that have it set too low.

echo min-cache-ttl=1800 | sudo tee -a /etc/NetworkManager/dnsmasq.d/cache.conf
sudo systemctl reload NetworkManager

This will ensure that even if a DNS record is configured with, e.g. 2 minutes TTL on remote nameserver, dnsmasq will still cache it for 30 minutes.

Note that this is acceptable for desktop machines, but not for web servers:

Phew, now I think that’s about it for dnsmasq today. Enjoy your faster DNS and be sure to subscribe for our Twitter for more fine articles ????

DOCKER INSTALL CENTOS7

CentOS 7 non-root users install source version of Docker

  1. Check if the current host has a docker group

cat /etc/group | grep docker

sudo groupadd docker

cat /etc/group | grep docker

useradd test

cat /etc/passwd | grep dev01

Add sudo permissions for new users

vi /etc/sudoers
??Add on line 92 next line
??dev01 ALL = (ALL) ALL

  1. Add the current user to the docker group (at this time the user has not joined the docker group)

gpasswd -a admin docker

https://download.docker.com/linux/static/stable/x86_64/docker-19.03.7.tgz

mkdir /docker

tar -zxvf docker-19.03.7.tgz -C /docker

cp docker/* /usr/bin/

chown root:docker /usr/bin/docker*
chown root:docker /usr/bin/containerd*
chown root:docker /usr/bin/runc
chown root:docker /usr/bin/ctr

ll /usr/bin/ | grep docker

vi /etc/systemd/system/docker.service

[Unit]
Description=Docker Application Container Engine
Documentation=https://docs.docker.com
After=network-online.target firewalld.service
Wants=network-online.target

[Service]
Type=notify
ExecStart=/usr/bin/dockerd
ExecReload=/bin/kill -s HUP $MAINPID
LimitNOFILE=infinity
LimitNPROC=infinity
LimitCORE=infinity
TimeoutStartSec=0
Delegate=yes
KillMode=process
Restart=on-failure
StartLimitBurst=3
StartLimitInterval=60s

[Install]
WantedBy=multi-user.target

chmod a+x /etc/systemd/system/docker.service
systemctl daemon-reload

vi /etc/docker/daemon.json

{
“registry-mirrors”: [“http://hub-mirror.rmohan.com”]
}

systemctl start docker

docker basic commands

docker start / stop / restart / view the status
sudo systemctl start / stop / restart / status

View docker has been mirrored
docker images

in the docker’s official website searches for the specified mirror
docker search image

Download image (without labeling the default download the latest version of the image)
docker pull Mirror Name: tag (ie tag)

Start the container (run the image-based container with the name xxx, and map the container port to the local port, and the container directory file is stored in the local directory)

docker run -d -name xxx -p Local port: Container port -v native directory: container directory image name: tag (or ID)

into the running container

docker exec -it container name (or ID) / bin / bash

container start / stop / restart / information / delete

docker start / stop / restart / inspect / rm container name (or ID)

view running containers

docker ps

view all containers (including running, stopped, not including deleted)

docker ps -a

image deletion (before deleting the image Please delete all containers related to this image)

docker rmi image name: tag (or ID)

view information about currently installed docker

docker info

yum install -y yum-utils device-mapper-persistent-data lvm2

yum-config-manager –add-repo https://mirrors.aliyun.com/docker-ce/linux/centos/docker-ce.repo

yum install docker-ce

systemctl enable docker

systemctl start docker

groupadd docker

usermod -aG docker $USER

docker volume create portainer_data

docker run -d -p 9000:9000 -v /var/run/docker.sock:/var/run/docker.sock -v portainer_data:/data portainer/portainer

Docker common commands
docker ps -view all containers currently running -a display including stopped containers

docker pull -pull images

docker rmi -After deleting the image, you can match it directly based on the image name or the first letter of the tag

docker start container_id- open container (here can be container id or name)

docker stop container_id -stop container (here can be container id or name)

docker rm -delete a container (only stopped containers can be deleted)

docker build -create images using Dockerfile

docker exec -execute commands in the container, for example: docker exec -it container_id (container name or id) / bin / bash (bin / bash command or tool to execute)

docker logs –View container logs, for example: docker logs -f -t –tail 10 container_id (container name or id)

Run the container

docker run -it –rm -p 8000:80 –name aspnet_sample microsoft/dotnet__

–name container name, followed by mirror path or name

–rm delete the container after running

-p port mapping 8000 external port 80 mirroring running port mapping 8000 to 80 mirroring

-it outputs the contents of the container command line, that is, the container’s own program output is a bit similar to the foreground run in the console

-d Contrary to it Hide background run

LEMP is an acronym for Linux, Nginx (pronounced Engine X), MariaDB / MySQL, and PHP. Centos 8.1

LEMP is a software stack that includes a set of free open source tools that are used to power high traffic and dynamic websites. LEMP is an acronym for Linux, Nginx (pronounced Engine X), MariaDB / MySQL, and PHP.

Nginx is an open source, powerful and high-performance web server that can also double as a reverse proxy. MariaDB is a database system for storing user data, while PHP is a server-side scripting language for developing and supporting dynamic web pages.

Related:

In this article, you will learn how to install a LEMP server on a CentOS 8 Linux distribution.

Step 1: Update the package on CentOS 8

First, update the repository and packages on CentOS 8 Linux by running the following dnf command.

dnf update

Step 2: Install Nginx web server on CentOS 8

After the package update is complete, install Nginx with a simple command.

dnf install nginx

Install Nginx on CentOS 8

The code snippet shows that the installation of Nginx went smoothly without any problems.

After the installation is complete, configure Nginx to start automatically at system startup, and verify that Nginx is running by executing a command.

systemctl enable nginx
systemctl start nginx
systemctl status nginx

nginx -v

Step 3: Install MariaDB on CentOS 8

MariaDB is a free and open source branch of MySQL and provides the latest features that make it a better alternative to MySQL. To install MariaDB, run the command.

dnf install mariadb-server mariadb -y

To make MariaDB start automatically at system startup, run.

systemctl start mariadb
systemctl enable mariadb

The MariaDB database engine is not secure and anyone can log in without credentials. To harden MariaDB and protect it to minimize the chance of unauthorized access, run the command.

mysql_secure_installation

Step 4: Install PHP 7 on CentOS 8

Finally, we will install the last LEMP component, PHP, which is a scripted web programming language that is usually used to develop dynamic web pages.

At the time of writing this guide, the latest version is PHP 7.4. We will install it using the Remi repository. The Remi database is a free database that comes with the latest cutting-edge software version and is not available on CentOS by default.

Run the following command to install the EPEL repository.

dnf install https://dl.Fedoraproject.org/pub/epel/epel-release-latest-8.noarch.rpm

dnf install dnf-utils http://rpms.remirepo.net/enterprise/remi-release-8.rpm

dnf module list php

CentOS-8 – AppStream
Name Stream Profiles Summary
php 7.2 [d][e] common [d], devel, minimal PHP scripting language
php 7.3 common, devel, minimal PHP scripting language

Remi’s Modular repository for Enterprise Linux 8 – x86_64
Name Stream Profiles Summary
php remi-7.2 common [d], devel, minimal PHP scripting language
php remi-7.3 common [d], devel, minimal PHP scripting language
php remi-7.4 common [d], devel, minimal PHP scripting language

dnf module reset php

dnf module enable php:remi-7.4

dnf install php php-opcache php-gd php-curl php-mysqlnd

php -v
PHP 7.4.3 (cli) (built: Feb 18 2020 11:53:05) ( NTS )
Copyright (c) The PHP Group
Zend Engine v3.4.0, Copyright (c) Zend Technologies
with Zend OPcache v7.4.3, Copyright (c), by Zend Technologies

systemctl start php-fpm
systemctl enable php-fpm

nano /etc/php-fpm.d/www.conf

user = apache
group = apache

user = nginx
group = nginx

systemctl restart nginx
systemctl restart php-fpm

cd /usr/share/nginx/html/
$echo “” > index.php

Build LAMP (Linux + Apache + MySQL + PHP) environment under CentOS 8.1

LAMP is an acronym for Linux, Apache, MySQL, and PHP, and is a popular free and open source stack used by webmasters and developers to test and host dynamic websites.
The LAMP server comes with 4 core components: Apache web server, MySQL or MariaDB database, and PHP (a popular scripting language for creating dynamic web pages).
Common LAMP architecture platform! LAMP is the most popular combination in the world, of course, there is also Nginx, which is LNMP: LAMP is more secure than NGINX,
but Nginx is more powerful than Apache in handling high concurrency. In this article, you will learn Install LAMP server on CentOS 8 Linux distribution.

Step 1: Update CentOS 8 software package
It is recommended that it is usually a good practice to update packages before starting the installation. So log in to your server and run the following command.

dnf update

dnf install httpd httpd-tools

systemctl enable httpd

systemctl start httpd

systemctl status httpd

httpd -v

rpm -qi httpd

centos8 with mariaDB

dnf install mariadb-server mariadb -y

systemctl start mariadb

systemctl enable mariadb

mysql_secure_installation

dnf install https://dl.Fedoraproject.org/pub/epel/epel-release-latest-8.noarch.rpm

dnf install dnf-utils http://rpms.remirepo.net/enterprise/remi-release-8.rpm

dnf module list php

dnf module reset php

dnf module enable php:remi-7.4

dnf install php php-opcache php-gd php-curl php-mysqlnd

dnf install php php-opcache php-gd php-curl php-mysqlnd

php -v

systemctl start php-fpm
systemctl enable php-fpm
systemctl status php-fpm

setsebool -P httpd_execmem 1

systemctl restart httpd