for i in `ls -al /var/spool/postfix |grep ‘^d’|awk ‘{print $9}’|grep -v ‘\.$’`; do c=`find $i|wc -l`; echo “$c $i”; done;
|
||||||
|
CentOS 6.7 ships with kernel 2.6 and it’s a quite old for now(CentOS 7 already comes with 3.10), but compile a kernel on CentOS is a mess and it’s not recommended. Enable ELRepo Project repository rpm –import https://www.elrepo.org/RPM-GPG-KEY-elrepo.org Install the kernel yum –enablerepo=elrepo-kernel install kernel-lt Configure grub You also need edit /etc/grub.conf to change the kernel order, change default from 1 to 0, must looks like the below: default=0 Reboot and profit! reboot Install LAMP + phpMyAdmin on 7 CentOS 7 / RHEL The main attention is now replaced by the MySQL database MariaDB, and therefore representative of the LAMP Linux + Apache + MariaDB + PHP up. System: The new CentOS 7 using systemd, thus some instruction vary ; now use alternative MariaDB MySQL as the database software, there will also be installed directly MariaDB. Set HOSTNAME echo “HOSTNAME=clusterserver3.rmohan.com” >> /etc/sysconfig/network INSTALL VIM yum -y install vim To make a color display code, and also supports line numbers and mouse positioning mark, you need to edit vim configuration file: vim /etc/vimrc set nu update configuration file /etc/hosts 192.168.1.22 clusterserver3.rmohan.com clusterserver3 remove the dhcp systemctl list-unit-files –type=service dhcp add timezone ln -sf /usr/share/zoneinfo/Singapore /etc/localtime yum update install http yum install httpd http://192.168.1.22 [root@clusterserver3 ~]# systemctl enable httpd firewall-cmd –add-service=http –permanent systemctl restart firewalld firewall-cmd –list-all # firewall-cmd –state install Mariadb yum install mariadb-server mariadb systemctl enable mariadb [root@clusterserver3 ~]# systemctl enable mariadb top -u mysql systemctl start mariadb Test MariaDB server in the local virtual machine CentOS 7 system, every time execution mysql command will always encounter “ERROR 2006 (HY000): MySQL server has gone away” error. Calibration of the time within a virtual machine, the aforementioned problems hours. Is there a necessary connection between the two is not to say, temporarily be recorded. Execute an instruction casually in MariaDB, whether create database or just flush privileges or, before the implementation of the results will show a similar instruction such output, MariaDB [(none)]> select now (); mysql_secure_installation [root@clusterserver3 ~]# mysql_secure_installation NOTE: RUNNING ALL PARTS OF THIS SCRIPT IS RECOMMENDED FOR ALL MariaDB In order to log into MariaDB to secure it, we’ll need the current Enter current password for root (enter for none): Setting the root password ensures that nobody can log into the MariaDB Set root password? [Y/n] Y New password: By default, a MariaDB installation has an anonymous user, allowing anyone Remove anonymous users? [Y/n] y Normally, root should only be allowed to connect from ‘localhost’. This Disallow root login remotely? [Y/n] y By default, MariaDB comes with a database named ‘test’ that anyone can Remove test database and access to it? [Y/n] y Reloading the privilege tables will ensure that all changes made so far Reload privilege tables now? [Y/n] y Cleaning up… All done! If you’ve completed all of the above steps, your MariaDB Thanks for using MariaDB! MariaDB [(none)]> show global variables like ‘max_allowed_packet’; MariaDB [(none)]> MariaDB [(none)]> set global max_allowed_packet=1024*1024*16; MariaDB [(none)]> show global variables like ‘max_allowed_packet’; MariaDB [(none)]> MariaDB [(none)]> select now(); MariaDB [(none)]> MariaDB [(none)]> select now(); MariaDB [(none)]> yum install php cp /etc/php.ini ~/confbak/php.ini.bak vi /etc/php.ini error_reporting = E_COMPILE_ERROR|E_RECOVERABLE_ERROR|E_ERROR|E_CORE_ERROR yum install php-mysql yum install http://dl.fedoraproject.org/pub/epel/7/x86_64/e/epel-release-7 yum install phpmyadmin cp /etc/httpd/conf.d/phpMyAdmin.conf ~/confbak/httpd/conf.d/phpMyAdmin.conf.bak #Alias /phpMyAdmin /usr/share/phpMyAdmin <Directory /usr/share/phpMyAdmin/> Require ip 127.0.0.1 cp /etc/phpMyAdmin/config.inc.php ~/confbak/config.inc.php.bak $cfg[‘blowfish_secret’] = ‘password’ systemctl restart httpd Windows VPS remotely manage the SSH login tool is PuTTY , but Linux, there is no need to use it. Linux, Unix (including Mac iOS) are bound to have a built-in command-line terminal, built OpenSSH commands. VPS Linux system through which to log on to be more convenient. Open a command line terminal in Linux, the direct input instruction,
ssh <username>@<serverdomain or IP> -p <port> Under normal circumstances, where Now enter the configuration, such as the above command used example, a user named username, VPS server server_IP, SSH service port on the server is 22, then,
cat >> ~/.ssh/config <<EOF
Host your_alias
    User username
    Hostname server_IP
    Port 22
EOF


Here your_alias can be any aliases you want, such as server.  Now you can simply type,
ssh your_alias


This configuration can also be combined with something else to features such as connection remains.  We do not want to make it in time to send a meaningless data operations to keep the connection will not be disconnected server automatically at regular intervals
cat "ServerAliveInterval 30" >> ~/.ssh/config
we begin, we should take a look at our server’s storage to see if we already have some swap space available. While we can have multiple swap files or swap partitions, one should generally be enough. If nothing is returned by the command, then the summary was empty and no swap file exists. create a Swap FileEnable a Swap FileMake the Swap File Permanentweak Your Swap Settings (Optional)SwappinessCache PressureRed Hat Enterprise Linux 7/CentOS 7 system that requires manual entry of a bootloader password in order to boot any future kernels Adding users and custom
Add a user to cat >>/etc/grub.d/40_custom <<\EOF
cat >>/etc/grub.d/40_custom <<\EOF
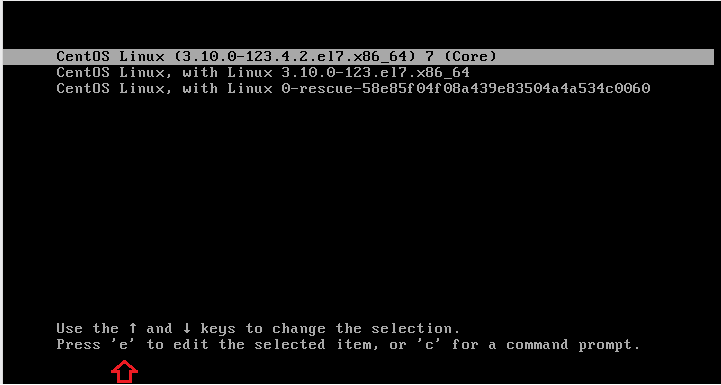
Reset Your Forgotten Root Password On CentOS 7To get started, turn on the machine that you’ve forgotten the root password on. For CentOS 7 devices, you’ll be given 5 seconds at the boot menu to select the operating system kernel to boot into. That 5 seconds is important, because allows for admins to select different kernels or edit existing kernel parameters before booting. At the boot menu, press e to edit the existing kernel (Core) as shown below.
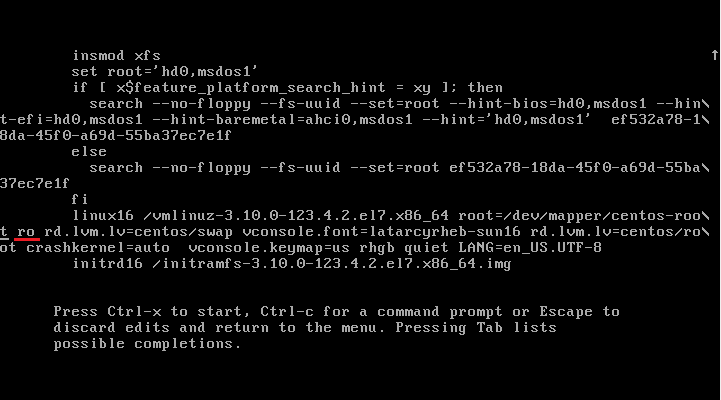
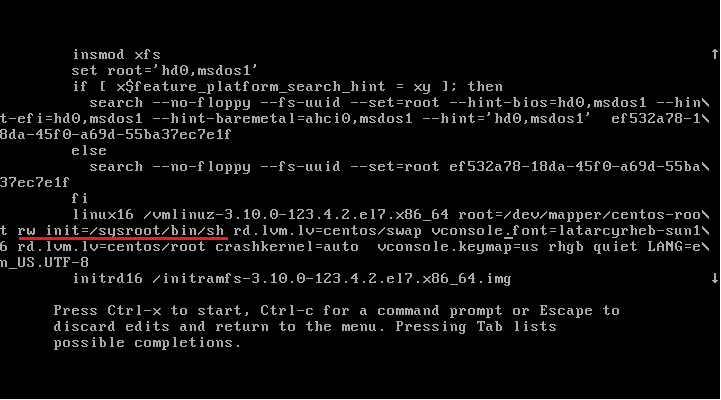
Next, scroll down to the list until you see the line underlined below ( ro ) . What we need to do is change that ro to rw and start into a bash shell. It should look like this rw init=/sysroot/bin/sh.
Change the ro line to rw and add init=/sysroot/bin/sh
Sometimes you forget stuff. I do. I forget important passwords for important websites sometimes. Retrieving your forgotten passwords for most websites is easy, all one has to do remember few details that were used when signing up for the service to get a password reset for an account. The difference is forgetting a password to a system or device with no easy way to reset it while locked out. CentOS 7 is one such system. If you forget the root password to your CentOS 7 machine, it’s almost virtually impossible to reset it while you’re locked out. This brief tutorial is going to show you a simple trick that you can use to reset your forgotten root password for CentOS 7 servers. This will definitely come in handy for webmasters who are locked out of your CentOS machine and can’t sign on. This tutorial will only work if you have direct access to the machine or serial terminal access with boot menu options. You can’t reset the root password if you’re remotely connected since you need boot menu access. To get started, turn on the machine that you’ve forgotten the root password on. For CentOS 7 devices, you’ll be given 5 seconds at the boot menu to select the operating system kernel to boot into. That 5 seconds is important, because allows for admins to select different kernels or edit existing kernel parameters before booting. At the boot menu, press e to edit the existing kernel (Core) as shown below.
Next, scroll down to the list until you see the line underlined below ( ro ) . What we need to do is change that ro to rw and start into a bash shell. It should look like this rw init=/sysroot/bin/sh.
Change the ro line to rw and add init=/sysroot/bin/sh
After changing that, press Control + X or Ctrl + X on your keyboard to start into single user mode using the bash shell specified above. In this mode, we’re going to change the root password. In the single user mode, run the command as shown below
You’ll be prompted to create and confirm a new password. After creating the password, run the commands below to update SELinux parameters
dism /online /cleanup–image /restorehealth Slow way
* The second command assumes you don’t have Java in your PATH already. If you do, you should edit it the usual way instead. Also note that if JAVA_HOME is already set, it will be expanded in the second command.
Now open up a new regular command prompt and run the following. > java -version
> mvn –version Both (skip mvn if you don’t have maven installed) should report Java version 1.7. SwappingSo, let’s say we want to change to java 1.5, we just need to run the following in an elevated command prompt. > cd \dev\java
> rmdir active && mklink /d active 1.5 If you now repeat the version checks we did in our regular command prompt they should both report version 1.5 instead of 1.7. And we didn’t even have to restart the command prompt. ShortcutTo prevent us from having to do this manually we could also create a simple bat file. I made one I called swap.bat which I put in the same directory as the symlinks with the following contents. @echo off
cd \dev\java && rmdir active && mklink /d active %~1 You could then create a short cut to for example If you have a better way, please leave a comment though. Always on the lookout for things and techniques that can make my developer life simpler Centos7 provide different naming convention is based on the default firmware, topology, location information to allocate. Naming rules Strategy Rule 1 : For the on-board device naming merger firmware or BIOS provides an index number, if from a firmware or BIOS -readable information on the name, such ENO1 , this name is relatively common, otherwise the rule 2 . Rule 2 : Naming merger firmware or BIOS provides a PCI-E hot-swappable port index, such as ENS1 , if the information is readable on the use, or the use of rule 3 . Rule 3 : Naming merge the physical location of the interface hardware, such as enp2s0 , available on naming failure directly to the program 5 . Rule 4 : Naming merge interface MAC address, such enx78e7d1ea46da , default is not used unless the user chooses to use this program. Rule 5 : Using the conventional approach, if all the programs have failed, eth0 . Meaning the first two characters of the vim /etc/sysconfig/grub |
||||||
|
Copyright © 2026 - All Rights Reserved Powered by WordPress & Atahualpa |
||||||


Recent Comments