TABLE OF CONTENTS (HIDE)
1. Introduction
1.1 Web Application (Webapp)
1.2 Hypertext Transfer Protocol (HTTP)
1.3 Apache Tomcat HTTP Server
2. How to Install Tomcat 7 and Get Started with Java Servlet Programming
2.1 STEP 0: Read the Tomcat Documentation
2.2 STEP 1: Download and Install Tomcat
2.3 STEP 2: Create an Environment Variable JAVA_HOME
2.4 STEP 3: Configure Tomcat Server
2.5 STEP 4: Start Tomcat Server
2.6 STEP 5: Develop and Deploy a WebApp
2.7 STEP 6: Write a “Hello-world” Java Servlet
2.8 STEP 7: Write a Database Servlet
2.9 (Advanced) Deploying Servlet using @WebServlet (Servlet 3.0 on Tomcat 7)
3. How to Debug?
This tutorial can be completed in a 3-hour session, with guidance from instructor.
This installation and configuration guide is applicable to Tomcat 7, and possibly the earlier versions.
(EE3072 Students) This guide is applicable to “IM3072”, but NOT applicable to “EE3072”. For EE3072, please read “Tomcat 6 – How to Install and Configure“.
1. Introduction
1.1 Web Application (Webapp)
A web application (or webapp), unlike standalone application, runs over the Internet. Examples of web applications are google, amazon, ebay, facebook and twitter. A webapp is typically a 3-tier (or multi-tier) client-server application, typically involving a database.
Most of the webapps run on the HTTP application protocol, with browser as the client to access an HTTP server.
A web database application requires five components, as illustrated below:
- HTTP Server: E.g., Apache HTTP Server, Apache Tomcat HTTP Server, Microsoft IIS, and etc.
- HTTP Client (or Web Browser): E.g., MSIE, FireFox, Chrome, and etc.
- Database: E.g., MySQL, Oracle, DB2, Infomix, MS SQL Server, MS Access, and etc.
- Client-Side Programs: could be written in HTML Form, JavaScript, VBScript, Flash, and etc.
- Server-Side Programs: could be written in Java Servlet/JSP, ASP, PHP, and etc.

A user, via a web browser, issue a URL to an HTTP server to start a webapp. The webapp first downloads a client-side program (such as an HTML form) into the browser. The user fills up the query criteria in the form. The client-side program sends the query parameters to a server-side program, which queries the database and returns the query result to the client. The client-side program displays the result on the browser.
1.2 Hypertext Transfer Protocol (HTTP)
HTTP is an asynchronous request-response application-layer protocol. A client sends a request message to the server. The server returns a response message to the client. The syntax of the message is defined in the HTTP specification.

.3 Apache Tomcat HTTP Server
Apache Tomcat is a Java-capable HTTP server, which could execute special Java programs known as Java Servlet and Java Server Pages (JSP). It is the official Reference Implementation (RI) for Java Servlets and JavaServer Pages (JSP) technologies. Tomcat is an open-source project, under the “Apache Software Foundation” (which also provides the famous open-source industrial-strength Apache HTTP Server). The mother site for Tomcat is http://tomcat.apache.org. Alternatively, you can find tomcat via the Apache mother site @ http://www.apache.org.
2. How to Install Tomcat 7 and Get Started with Java Servlet Programming
2.1 STEP 0: Read the Tomcat Documentation
Tomcat’s documentation is available at Tomcat mother site @ http://tomcat.apache.org. Select “Documentation” ? “Tomcat 7.0”.
2.2 STEP 1: Download and Install Tomcat
- From http://tomcat.apache.org ? Select “Downloads” ? “Tomcat 7.0” ? “7.0.xx” (where xx is the latest upgrade number) ? “Binary Distributions” ? “Core” ? “zip” ? “
apache-tomcat-7.0.xx.zip“. - UNZIP into a directory of your choice. DO NOT unzip onto the Desktop (because its path is hard to locate). I suggest using “
d:\myproject“. Tomcat will be unzipped into directory “d:\myproject\apache-tomcat-7.0.xx“. For ease of use, we shall shorten and rename this directory to “d:\myproject\tomcat“. Take note of Your Tomcat Installed Directory. Hereafter, I shall refer to the Tomcat installed directory as<TOMCAT_HOME>.
I recommend “zip” version, as you could simply delete the entire directory when Tomcat is no longer needed (without running any un-installer). You are free to move or rename the Tomcat’s installed directory. You can install (unzip) multiple copies of Tomcat in the same machine.
(For Mac Users) Read “How to Install Tomcat 7 on Mac” Step 1.
2.3 STEP 2: Create an Environment Variable JAVA_HOME
You need to create an environment variable called “JAVA_HOME” and set it to your JDK installed directory.
- First, take note of your JDK installed directory (the default is “
c:\program files\java\jdk1.7.0_xx”). - Start a CMD shell, and issue the command “
SET JAVA_HOME” to check if variableJAVA_HOMEis set:prompt> set JAVA_HOME Environment variable JAVA_HOME not defined
If
JAVA_HOMEis set (by other applications), check if it is set to your JDK installed directory. - To set/change an environment variable in Windows 2000/XP/Vista/7: Click “Start” button ? “Control Panel” ? “System” ? (Vista/7) “Advanced system settings” ? Switch to “Advanced” tab ? “Environment Variables” ? “System Variables” (or “User Variables” for the current user only) ? “New” (or “Edit” for modification) ? In “Variable Name” field, enter “
JAVA_HOME” ? In “Variable Value” field, enter your JDK installed directory (e.g., “c:\program file\java\jdk1.7.0“) – I suggest that you copy and paste the directory name to avoid typo error! - To verify, RE-STARTa CMD shell and issue:
prompt> set JAVA_HOME
JAVA_HOME=c:\program file\java\jdk1.7.0   <== CHECK! YOUR JDK installed directory
(For Mac Users) Take note of your JDK installed directory (most likely under /usr/local). Start a Terminal and run:
$ echo $JAVA_HOME                       // Check if JAVA_HOME is already set

// If JAVA_HOME is not set, then
$ java_home=your_jdk_install_directory  // Set environment variable java_home
$ export java_home                      // Make this variable available to all applications
To make permanent changes, store the above command in “.bash_profile” in your home directory (denoted as '~'), and run “source $HOME/.bash_profile” to refresh.
2.4 STEP 3: Configure Tomcat Server
(Note) Programmers need to view the file extension (such as .txt, .ini). To display the file extension in Windows, run “Control Panel” ? “Folder Options” ? Select tab “View” ? Uncheck “Hide extensions for known file types”.
The Tomcat configuration files are located in the “conf” sub-directory of your Tomcat installed directory (e.g. “d:\myproject\tomcat\conf“). There are 3 configuration files:
server.xmlweb.xmlcontext.xml
Make a backup of the configuration files before you proceed.
Step 3(a) “server.xml” – Set the TCP Port Number
Use a text editor (e.g., NotePad++, TextPad or NotePad) to open the configuration file “server.xml“, under the “conf” sub-directory of Tomcat installed directory (e.g. “d:\myproject\tomcat\conf“).
The default TCP port number configured in Tomcat is 8080, you may choose any number between 1024 and 65535, which is not used by an existing application. We shall use port 9999 in this article. (For production server, you should use port 80, which is pre-assigned to HTTP server as the default port number.)
<!-- Define a non-SSL HTTP/1.1 Connector on port 8080 -->
<Connector port="9999" protocol="HTTP/1.1" connectionTimeout="20000" redirectPort="8443" />
Step 3(b) “web.xml” – Enabling Directory Listing
Again, use a text editor to open the configuration file “web.xml“, under the “conf” sub-directory of Tomcat installed directory.
We shall enable directory listing by changing “listings” from “false” to “true” for the “default” servlet, as shown in red.
<!-- The default servlet for all web applications, that serves static     -->
<!-- resources.  It processes all requests that are not mapped to other   -->
<!-- servlets with servlet mappings.                                      -->
<servlet>
  <servlet-name>default</servlet-name>
  <servlet-class>org.apache.catalina.servlets.DefaultServlet</servlet-class>
  <init-param>
    <param-name>debug</param-name>
    <param-value>0</param-value>
  </init-param>
  <init-param>
    <param-name>listings</param-name>
    <param-value>true</param-value>
  </init-param>
  <load-on-startup>1</load-on-startup>
</servlet>
Step 3(c) “context.xml” – Enabling Automatic Reload
Again, use a text editor to open the configuration file “context.xml“, under the “conf” sub-directory of Tomcat installed directory.
We shall add the attribute reloadable="true" to the <Context> element to enable automatic reload after code changes, as shown in red.
<Context reloadable="true">
   ......
</Context>
2.5 STEP 4: Start Tomcat Server
The Tomcat’s executable programs are kept in the “bin” sub-directory of the Tomcat installed directory (e.g., “d:\myproject\tomcat\bin“).
Step 4(a) Start Server
Launch a CMD shell. Set the current directory to “<TOMCAT_HOME>\bin“, and run “startup.bat” as follows:
// Change the current directory to Tomcat's "bin"
// Assume that Tomcat is installed in "d:\myproject\tomcat"
prompt> d:                     // Change the current drive
D:\...> cd \                   // Change Directory to ROOT directory
D:\> cd \myproject\tomcat\bin  // Change Directory to YOUR Tomcat's "bin" directory

// Start Tomcat Server
D:\myproject\tomcat\bin> startup
A new Tomcat console window appears. Study the messages on the console. Look out for the Tomcat’s port number (double check that Tomcat is running on port 9999). Future error messages will be send to this console. System.out.println() issued by your Java servlets will also be sent to this console.
......
INFO: Initializing Coyote HTTP/1.1 on http-9999
......
INFO: Starting Coyote HTTP/1.1 on http-9999
......
INFO: Server startup in 699 ms
(For Mac Users) Read “How to Install Tomcat 7 on Mac” Step 2.
Step 4(b) Start a Client to Access the Server
Start a browser (as a HTTP client), and issue URL “http://localhost:9999” to access the Tomcat server’s welcome page. The hostname “localhost” (with IP address of 127.0.0.1) is meant for local loop-back testing. For users on the other machines over the net, they have to use the server’s IP address or DNS domain name or hostname in the format of “http://serverHostnameOrIPAddress:9999“.

Step 4(c) Shutdown Server
You can shutdown the server by running “<TOMCAT_HOME>\bin\shutdown.bat“. If Tomcat does not respond to the shutdown command, you could terminate Tomcat by pushing control-c (or control-break) on the Tomcat’s console. DO NOT kill the cat by pushing the “close” button.
(Skip Unless …) Cannot Start Tomcat
- Check the Error Messages on Tomcat’s Console. Most of the error messages have tens of lines. You need to scroll up slowly from the last message to look for the first-line of the error messages.
- Check the Tomcat’s log files, located at
"<TOMCAT_HOME>\logs“. “catalina.yyyy-mm-dd.log” shows the Tomcat’s startup messages. Also check the “localhost.yyyy-mm-dd.log“.
Read “Common Errors in Starting Tomcat after Installation“.
2.6 STEP 5: Develop and Deploy a WebApp
Step 5(a) Create the Directory Structure for your WebApp

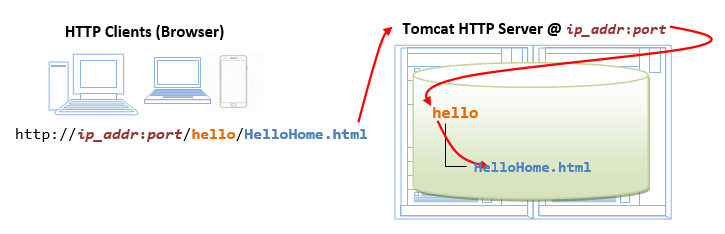
First of all, choose a name for your webapp. Let us call it “hello“. Navigate to Tomcat’s “webapps” sub-directory, and create the following directory structure for you webapp “hello“, as illustrated:
- Under Tomcat’s “
webapps“, create your web application root directory “hello” (i.e., “<TOMCAT_HOME>\webapps\hello“). - Under “
hello“, create a sub-directory “WEB-INF” (case sensitive, a “dash” not an underscore) (i.e., “<TOMCAT_HOME>\webapps\hello\WEB-INF“). - Under “
WEB-INF“, create a sub-directory “classes” (case sensitive, plural) (i.e., “<TOMCAT_HOME>\webapps\hello\WEB-INF\classes“).
You need to keep your web resources (e.g., HTMLs, CSSs, images, scripts, servlets, JSPs) in the proper directories:
- “
hello“: The is called the context root (or document base directory) of your web application. You should keep all your HTML files and resources visible to the web users (e.g., CSSs, images, scripts, JSPs) under this context root. - “
hello\WEB-INF“: This directory, although under the context root, is not visible to the web users. This is where you keep your application’s configuration files “web.xml“. - “
hello\WEB-INF\classes“: This is where you keep all the Java classes such as servlet class-files.
You should RE-START your Tomcat server. Check the Tomcat’s console to confirm that “hello” application has been properly depolyed:
......
INFO: Deploying web application directory ...\hello
......
You can issue the following URL to access the web application “hello“:
http://localhost:9999/hello
You should see the directory listing of the directory “<TOMCAT_HOME>\webapps\hello“, which shall be empty.
Step 5(b) Write a Welcome Page
Create the following HTML page and save as “HelloHome.html” in your application’s root directory “hello“.
1 2 3 4 5 6 |
<html>
  <head><title>My Home Page</title></head>
  <body>
    <h1>My Name is so and so. This is my HOME.</h1>
  </body>
</html>
|
You can browse this page by issuing this URL:
You can browse this page by issuing this URL:
http://localhost:9999/hello/HelloHome.html
Alternatively, you can issue an URL to your web application root “hello“:
http://localhost:9999/hello
T
Now, the server will redirect the directory request to “index.html“, if the root directory contains an “index.html“, instead of serving the directory listing.
You can check out the home page of your peers by issuing (or access your own server from another machine):
http://YourPeerHostnameOrIPAddress:9999/hello
http://YourPeerHostnameOrIPAddress:9999/hello/HelloHome.html
http://YourPeerHostnameOrIPAddress:9999/hello/index.html
with a valid “YourPeerHostnameOrIPAddress“, provided that your peer has started his/her web server. You can use command such as “ipconfig“, “winipcfg“, “ping” to find your IP address.
(Skip Unless…) The likely errors are “Unable to Connect”, “Internet Explorer cannot display the web page”, and “404 File Not Found”. Read “How to Debug” section.
2.7 STEP 6: Write a “Hello-world” Java Servlet
A servlet is Java program that runs inside a Java-capable HTTP Server, such as Apache Tomcat. A web user invokes a servlet by issuing an appropriate URL from a web browser (or HTTP client).
Before you proceed, I shall assume that you are familiar with Java Programming and have installed the followings:
- JDK (Read “How to install JDK and Get Started“).
- A programming text editor, such as TextPad or Notepad++ (Read “Programming Text Editor“); or a Java IDE such as Eclipse or NetBeans (Read “How to Install Eclipse” or “How to Install NetBeans“).
Step 6(a) Install Servlet API Library
Before we can write our first servlet, we need to install the Servlet API. Servlet API is not part of JDK (but belongs to Java EE). Tomcat also includes a copy of Servlets API.
COPY the Tomcat’s Servlet API JAR-file located at “<TOMCAT_HOME>\lib\servlet-api.jar“, (e.g., “d:\myproject\tomcat\lib\servlet-api.jar“) into JDK’s extension directory at “<JAVA_HOME>\jre\lib\ext“, (e.g., “c:\program files\java\jdk1.7.0\jre\lib\ext“).
(For Advanced Users Only) Alternatively, you could include the Servlet API JAR-file in the CLASSPATH. Open “Control Panel” ? System ? (Vista/7 only) Advanced system settings ? Switch to “Advanced” tab ? Environment variables ? Choose “System Variables” (for all users in this system) or “User Variables” (for this login user only) ? Choose “New” or “Edit”? In “Variable Name”, enter “classpath” ? In “Variable Value”, enter “.;path-to\servlet-api.jar“, where “path-to” includes the drive letter and path of the Servlet API jar-file “servlet-api.jar“. You can also compile your program using “javac -cp .;path-to\servlet-api.jar ServletName“.
Step 6(b) Write a “Hello-world” Java Servlet
A Java servlet is a Java program that runs inside a HTTP server. A web user invokes a servlet by issuing a URL from a browser (or HTTP client).
In this example, we are going to write a Java servlet called HelloServlet, which says “Hello, world!”. We will then write a configuration such that web users can invoke this servlet by issuing URL http://hostname:port/hello/sayhello from the browser, as illustrated:

Write the following source codes called “HelloServlet.java” and save it under your application “classes” directory (i.e., “<TOMCAT_HOME>\webapps\hello\WEB-INF\classes\HelloServlet.java“). Compile the source into “HelloServlet.class“. This servlet says “Hello”, echos some request information, and prints a random number upon each request.
1 2 3 4 5 6 7 8 9 10 11 12 13 14 15 16 17 18 19 20 21 22 23 24 25 26 27 28 29 30 31 32 33 34 |
// To save as "<TOMCAT_HOME>\webapps\hello\WEB-INF\classes\HelloServlet.java"
import java.io.*;
import javax.servlet.*;
import javax.servlet.http.*;

public class HelloServlet extends HttpServlet {
   @Override
   public void doGet(HttpServletRequest request, HttpServletResponse response)
         throws IOException, ServletException {

      // Set the response MIME type of the response message
      response.setContentType("text/html");
      // Allocate a output writer to write the response message into the network socket
      PrintWriter out = response.getWriter();

      // Write the response message, in an HTML page
      try {
         out.println("<html>");
         out.println("<head><title>Hello, World</title></head>");
         out.println("<body>");
         out.println("<h1>Hello, world!</h1>");  // says Hello
         // Echo client's request information
         out.println("<p>Request URI: " + request.getRequestURI() + "</p>");
         out.println("<p>Protocol: " + request.getProtocol() + "</p>");
         out.println("<p>PathInfo: " + request.getPathInfo() + "</p>");
         out.println("<p>Remote Address: " + request.getRemoteAddr() + "</p>");
         // Generate a random number upon each request
         out.println("<p>A Random Number: <strong>" + Math.random() + "</strong></p>");
         out.println("</body></html>");
      } finally {
         out.close();  // Always close the output writer
      }
   }
}
|
(Skip Unless…) Read “Common Errors in Compiling Java Servlet“.
Step 6(c) Configure Servlet’s Request URL in “webapps\hello\WEB-INF\web.xml“
A web user invokes a servlet, which is kept in the web server, by issuing a request URL from the browser. We need to configure this request URL for our HelloServlet.
Create the following configuration file called “web.xml“, and save it under “webapps\hello\WEB-INF” (i.e., “<TOMCAT_HOME>\webapps\hello\WEB-INF\web.xml“).
1 2 3 4 5 6 7 8 9 10 11 12 13 14 15 16 17 18 19 20 21 |
<?xml version="1.0" encoding="ISO-8859-1"?>
<web-app version="3.0"
  xmlns="http://java.sun.com/xml/ns/javaee"
  xmlns:xsi="http://www.w3.org/2001/XMLSchema-instance"
  xsi:schemaLocation="http://java.sun.com/xml/ns/javaee http://java.sun.com/xml/ns/javaee/web-app_3_0.xsd">

   <!-- To save as "hello\WEB-INF\web.xml" -->

   <servlet>
      <servlet-name>HelloWorld</servlet-name>
      <servlet-class>HelloServlet</servlet-class>
   </servlet>

   <!-- Note: All <servlet> elements MUST be grouped together and placed IN FRONT of the <servlet-mapping> elements -->

   <servlet-mapping>
      <servlet-name>HelloWorld</servlet-name>
      <url-pattern>/sayhello</url-pattern>
   </servlet-mapping>
</web-app>
|
In the above configuration, a servlet having a class file “HelloServlet.class” is mapped to request URL “/sayhello” (via an arbitrary servlet-name “HelloWorld“), under this web application “hello“. In other words, the complete request URL for this servlet is “http://hostname:port/hello/sayhello“.
This configuration file, saved under your web application “hello“, is applicable only to this particular web application “hello“.
Restart your Tomcat server.
IMPORTANT: For EACH servlet, you need to write a pair of <servlet> and <servlet-mapping> elements with a common <servlet-name>. Take note that all the <servlet> elements MUST be grouped together and placed IN FRONT of the <servlet-mapping> elements.
Step 6(d) Invoke the Servlet
To run this servlet, start a browser, and issue the request URL configured earlier:
http://localhost:9999/hello/sayhello
You shall see the output of the servlet displayed in your web browser.
Refresh the browser, you shall see a new random number upon each refresh. In other word, the doGet() method of the servlet runs once per request.
Try “View Source” to look at the output received by the web users. Take note that the web users receive only the output of the servlet (generated via the out.println() statements). They have no access to the servlet programs (which may contain confidential information).
<html>
<head><title>Hello, World</title></head>
<body>
<h1>Hello, world!</h1>
<p>Request URI: /hello/sayhello</p>
<p>Protocol: HTTP/1.1</p>
<p>PathInfo: null</p>
<p>Remote Address: 127.0.0.1</p>
<p>A Random Number: <strong>0.3523682325749493</strong></p>
</body>
</html>
(Skip Unless…) The likely errors are “404 File Not Found” and “500 Internal Server Error”. Read “How to debug” Section.
2.8 STEP 7: Write a Database Servlet
This section assumes that you are familiar with Java database programming and MySQL database server. Otherwise, read “How to Install MySQL and Get Started“.
Step 7(a) Setup a Database on MySQL
Start your MySQL server. Take note of the server’s port number. I shall assume that the MySQL server is running on port 8888 (whereas the Tomcat is running on port 9999).
D:\myproject\mysql\bin> mysqld --console
Start a MySQL client. I shall assume that there is a user called “myuser” with password “xxxx“.
D:\myproject\mysql\bin> mysql -u myuser -p
Run the following SQL statements to create a database called “ebookshop“, with a table called “books” with 5 columns: id, title, author, price, qty.
create database if not exists ebookshop;

use ebookshop;

drop table if exists books;
create table books (
   id     int,
   title  varchar(50),
   author varchar(50),
   price  float,
   qty    int,
   primary key (id));

insert into books values (1001, 'Java for dummies', 'Tan Ah Teck', 11.11, 11);
insert into books values (1002, 'More Java for dummies', 'Tan Ah Teck', 22.22, 22);
insert into books values (1003, 'More Java for more dummies', 'Mohammad Ali', 33.33, 33);
insert into books values (1004, 'A Cup of Java', 'Kumar', 55.55, 55);
insert into books values (1005, 'A Teaspoon of Java', 'Kevin Jones', 66.66, 66);

select * from books;
Step 7(b) Install MySQL JDBC Driver
You need to download MySQL JDBC driver if you have not done so. Read “Installing the MySQL JDBC Driver“.
(For Advanced User Only) You could also place the MySQL driver jar-file “mysql-connector-java-5.1.xx-bin.jar” in Tomcat’s “lib” directory.
Step 7(c) Write a Client-side HTML Form
Let’s write an HTML script to create a query form with 3 checkboxes and a submit button, as illustrated below. Save the HTML file as “querybook.html” in your application root directory “<TOMCAT_HOME>\webapps\hello”.

1 2 3 4 5 6 7 8 9 10 11 12 13 14 15 |
<html>
<head>
  <title>Yet Another Bookshop</title>
</head>
<body>
  <h2>Yet Another Bookshop</h2>
  <form method="get" action="http://localhost:9999/hello/doquery">
    <b>Choose an author:</b>
    <input type="checkbox" name="author" value="Tan Ah Teck">Ah Teck
    <input type="checkbox" name="author" value="Mohammad Ali">Ali
    <input type="checkbox" name="author" value="Kumar">Kumar
    <input type="submit" value="Search">
  </form>
</body>
</html>
|
You can browse the HTML page by issuing the following URL:
http://localhost:9999/hello/querybook.html
Check a box (e.g., “Tan Ah Teck”) and click the “Search” button. An HTTP GET request will be issued to the URL specified in the <form>‘s “action” attribute. Observe the URL of the HTTP GET request:
http://localhost:9999/hello/doquery?author=Tan+Ah+Teck
The request consists of two part: a URL corresponding to the “action” attribute of the <form> tag, and the “name=value” pair extracted from the <input> tag, separated by a '?'. Take note that blanks are replaced by '+' (or %20), because blanks are not allowed in the URL.
If you check two boxes (e.g., “Tan Ah Teck” and “Mohammad Ali”), you will get this URL, which has two “name=value” pairs separated by an '&'.
http://localhost:9999/hello/doquery?author=Tan+Ah+Teck&author=Mohammad+Ali
You are expected to get an error “404 File Not Found”, as you have yet to write the server-side program.
Step 7(d) Write the Server-side Database Query Servlet
The next step is to write a Java servlet, which responses to the client’s request by querying the database and returns the query results.
1 2 3 4 5 6 7 8 9 10 11 12 13 14 15 16 17 18 19 20 21 22 23 24 25 26 27 28 29 30 31 32 33 34 35 36 37 38 39 40 41 42 43 44 45 46 47 48 49 50 51 52 53 54 55 56 57 58 59 60 61 62 63 64 |
// To save as "<TOMCAT_HOME>\webapps\hello\WEB-INF\classes\QueryServlet.java".
import java.io.*;
import java.sql.*;
import javax.servlet.*;
import javax.servlet.http.*;

public class QueryServlet extends HttpServlet {  // JDK 6 and above only

   // The doGet() runs once per HTTP GET request to this servlet.
   @Override
   public void doGet(HttpServletRequest request, HttpServletResponse response)
               throws ServletException, IOException {
      // Set the MIME type for the response message
      response.setContentType("text/html");
      // Get a output writer to write the response message into the network socket
      PrintWriter out = response.getWriter();

      Connection conn = null;
      Statement stmt = null;
      try {
         // Step 1: Allocate a database Connection object
         conn = DriverManager.getConnection( "jdbc:mysql://localhost:8888/ebookshop", "myuser", "xxxx"); // <== Check!
            // database-URL(hostname, port, default database), username, password

         // Step 2: Allocate a Statement object within the Connection
         stmt = conn.createStatement();

         // Step 3: Execute a SQL SELECT query
         String sqlStr = "select * from books where author = " + "'" + request.getParameter("author") + "'" + " and qty > 0 order by price desc";

         // Print an HTML page as the output of the query
         out.println("<html><head><title>Query Response</title></head><body>");
         out.println("<h3>Thank you for your query.</h3>");
         out.println("<p>You query is: " + sqlStr + "</p>"); // Echo for debugging
         ResultSet rset = stmt.executeQuery(sqlStr);  // Send the query to the server

         // Step 4: Process the query result set
         int count = 0;
         while(rset.next()) {
            // Print a paragraph <p>...</p> for each record
            out.println("<p>" + rset.getString("author")
                 + ", " + rset.getString("title")
                 + ", $" + rset.getDouble("price") + "</p>");
            count++;
         }
         out.println("<p>==== " + count + " records found =====</p>");
         out.println("</body></html>");
     } catch (SQLException ex) {
        ex.printStackTrace();
     } finally {
        out.close();  // Close the output writer
        try {
           // Step 5: Close the resources
           if (stmt != null) stmt.close();
           if (conn != null) conn.close();
        } catch (SQLException ex) {
           ex.printStackTrace();
        }
     }
   }
}
|
Step 7(e) Configure the Request URL for the Servlet
Open the configuration file “web.xml” of your application “hello” that you have created earlier for the HelloServlet, i.e., “<TOMCAT_HOME>\webapps\hello\WEB-INF\web.xml“. Add the lines that are shown in red at the correct locations.
1 2 3 4 5 6 7 8 9 10 11 12 13 14 15 16 17 18 19 20 21 22 23 24 25 26 27 28 29 30 31 |
<?xml version="1.0" encoding="ISO-8859-1"?>
<web-app version="3.0"
  xmlns="http://java.sun.com/xml/ns/javaee"
  xmlns:xsi="http://www.w3.org/2001/XMLSchema-instance"
  xsi:schemaLocation="http://java.sun.com/xml/ns/javaee http://java.sun.com/xml/ns/javaee/web-app_3_0.xsd">

   <!-- To save as "hello\WEB-INF\web.xml" -->

   <servlet>
      <servlet-name>HelloWorld</servlet-name>
      <servlet-class>HelloServlet</servlet-class>
   </servlet>

   <servlet>
      <servlet-name>UserQuery</servlet-name>
      <servlet-class>QueryServlet</servlet-class>
   </servlet>

   <!-- Note: All <servlet> elements MUST be grouped together and placed IN FRONT of the <servlet-mapping> elements -->

   <servlet-mapping>
      <servlet-name>HelloWorld</servlet-name>
      <url-pattern>/sayhello</url-pattern>
   </servlet-mapping>

   <servlet-mapping>
      <servlet-name>UserQuery</servlet-name>
      <url-pattern>/doquery</url-pattern>
   </servlet-mapping>
</web-app>
|
The above lines configure the following URL to invoke QueryServlet:
http://localhost:9999/hello/doquery
Step 7(f) Invoke the Servlet from the Client-Side Form
Issue the following URL to browse the HMTL form “querybook.html” that you have created earlier:
http://localhost:9999/hello/querybook.html
Select an author (e.g., “Tan Ah Teck”) and click the submit button, which activates the following URL coded in the <form>‘s “action” attribute, together with the name=value pair:
http://localhost:9999/hello/doquery?author=Tan+Ah+Teck
This URL “/doquery” triggers QueryServlet. The QueryServlet retrieves the name=value pair of “author=Tan+Ah+Teck“. Inside the QueryServlet, the method request.getParameter("author") returns “Tan Ah Teck“, which is inserted into the SQL SELECT command to query the database. The processed query result is then written to the client as an HTML document.
(Skip Unless…) The likely errors are “404 File Not Found” and “500 Internal Server Error”. Read “How to debug” Section.
2.9 (Advanced) Deploying Servlet using @WebServlet (Servlet 3.0 on Tomcat 7)
Servlet 3.0, which is supported by Tomcat 7, introduces the @WebServlet annotation, which greatly simplifies the deployment of servlets. You no longer need to write the deployment descriptor in “web.xml“. Instead, you can use the @WebServlet annotation to specify the url mapping.
For example, let us write a new servlet called AnotherHelloServlet.java, by modifying the HelloServlet.java written earlier, with url mapping of “sayhi“.
1 2 3 4 5 6 7 8 9 10 11 12 13 14 15 16 17 18 19 20 21 22 23 24 25 26 27 28 29 30 31 32 33 34 35 36 |
// To save as "<TOMCAT_HOME>\webapps\hello\WEB-INF\classes\AnotherHelloServlet.java"
import java.io.*;
import javax.servlet.*;
import javax.servlet.http.*;
import javax.servlet.annotation.*;

@WebServlet("/sayhi")
public class AnotherHelloServlet extends HttpServlet {
   @Override
   public void doGet(HttpServletRequest request, HttpServletResponse response)
         throws IOException, ServletException {

      // Set the response MIME type
      response.setContentType("text/html;charset=UTF-8");
      // Allocate a output writer to write the response message into the network socket
      PrintWriter out = response.getWriter();

      // Write the response message, in an HTML page
      try {
         out.println("<html>");
         out.println("<head><title>Hello, World</title></head>");
         out.println("<body>");
         out.println("<h1>Hello world, again!</h1>");  // says Hello
         // Echo client's request information
         out.println("<p>Request URI: " + request.getRequestURI() + "</p>");
         out.println("<p>Protocol: " + request.getProtocol() + "</p>");
         out.println("<p>PathInfo: " + request.getPathInfo() + "</p>");
         out.println("<p>Remote Address: " + request.getRemoteAddr() + "</p>");
         // Generate a random number upon each request
         out.println("<p>A Random Number: <strong>" + Math.random() + "</strong></p>");
         out.println("</body></html>");
      } finally {
         out.close();  // Always close the output writer
      }
   }
}
|
In Line 7, the annotation @WebServlet("/sayhi") is used to declare the url mapping for this servlet, i.e., http://localhost:9999/hello/sayhi. There is no need to provide any more configuration in “web.xml“!
3. How to Debug?
“Everything that can possibly go wrong will go wrong.”
Always…
- Refresh your browser using Cntl-F5 (instead of refresh button or simply F5) to get a fresh copy, instead of from the cache.
- You may re-start your Tomcat. You may also re-start your browser to clear the cache.
- Check your spelling! Always assume that all programs are case-sensitive. Don’t type, copy and paste if possible!
- If Tomcat can be started, but you cannot run your servlet. Goto the Tomcat’s home page (
http://localhost:9999), and try to run the “servlets examples” to ensure that Tomcat is properly installed. - Try accessing your application root, e.g.,
http://localhost:9999/hello. You shall see the directory listing (if you have enabled the directory listing option in “web.xml” in Step 3(b)). - and MOST IMPORTANTLY – Find the ERROR MESSAGE!!!
- Check the Error Messages on Tomcat’s Console. Most of the error messages have tens of lines. You need to scroll up slowly from the last message to look for the first-line of the error messages.
- Check the Tomcat’s log files, located at “
<TOMCAT_HOME>\logs” directory. “catalina.yyyy-mm-dd.log” shows the Tomcat’s startup messages. Also check the “localhost.yyyy-mm-dd.log“.
- If things were running fine until the lightning strikes, ask yourself “what have I changes?”
(Firefox) Unable to Connect
(IE) Internet Explorer cannot display the webpage
(Chrome) Oops! Google Chrome could not connect to …
Cause: You are simply not connecting to your Tomcat.
Solution:
- Check if your Tomcat server has been started?
- Check the hostname and port number, separated by a colon
':', of your URL (http://localhost:9999/...).
Error 404 File Not Found
Cause: You have connected to your Tomcat. But Tomcat server cannot find the HTML file or Servlet that your requested.
Solution:
- Check your spelling! The path is case-sensitive!
- For HTML file with URL
http://localhost:9999/xxxx/filename.html:- Open Tomcat’s “
webapps” directory, check if sub-directory “xxxx” exists. It is case-sensitive. - Open the “
xxxx” directory, check if “filename.html” exists.
- Open Tomcat’s “
- For Servlet with URL
http://localhost:9999/xxxx/servletURL:- Check the Tomcat’s console for error message. Your application cannot be deployed if you make a mistake in editing “
web.xml“, which triggered many error messages. - Check the Tomcat console to make sure that your application has been deployed.
- Open Tomcat’s “
webapps” directory, check if sub-directory “xxxx” exists. - Open the “
xxxx” directory, check if sub-sub-directory “WEB-INF” (uppercase with a dash) exists. - Open the “
WEB-INF“, check if sub-sub-sub directory “classes” (lowercase, plural) exists. - Open the configuration file “
WEB-INF\web.xml“:- Check that
servletURLis defined in a<servlet-mapping>tag. Take note of thenamein<servlet-name>tag. - Based on the
namenoted, look for the matching<servlet-class>tag. Take note of theServletClassname. - Open “
WEB-INF\classes“, check if “ServletClassname.class” that you noted exists (Note: It is “.class“, and NOT “.java“. You need to compile the “.java” to get the “.class“.)
- Check that
- Check the Tomcat’s console for error message. Your application cannot be deployed if you make a mistake in editing “
Error 500 Internal Server Error
Error 500 should have triggered many error message in the Tomcat’s console. Go to the Tomcat’s console, find the error message. The error message spans tens of lines. You need to scroll up slowly to look for the first line of the error message. The error message should tell you the cuase of this error, e.g. SQL syntax error, wrong user/password, etc.
For database servlet, you may check the error messages at “Common Errors in JDBC Programming“.
- For “No suitable driver found” (Windows) or
NullPointerException(Mac and Linux): Read Step 7(b) again, again, and again.
Error 505: GET (or POST) Method Not Supported
Check you servlet to make sure that you have defined a doGet() (or doPost()) method.
Others
This article is meant for advanced programmers who is interested to know more about Tomcat; or using Tomcat for production. For novices, read “How to Install and Get Started with Tomcat“.
The authoritative source of information on Tomcat is the Tomcat’s documentation, available under Tomcat’s “webapps\docs” directory. You may also refer to the Java Servlet, JSP and JSF specifications, as Tomcat is the Reference Implementation for these technologies.
I shall assume that Tomcat is installed in d:\myproject\tomcat, and shall denote this directory as $CATALINA_HOME (Unix-style) or %CATALINA_HOME% (Windows-style). Catalina is the codename for Tomcat 5 and above.
Tomcat’s Architecture and the main configuration file “server.xml”
Tomcat is an HTTP server. Tomcat is also a container that can execute Java Servlet, and converting JavaServer Pages (JSP) and JavaServerFaces (JSF) to Java Servlet. Tomcat employs a hierarchical and modular architecture as illustrated:

Tomcat’s main configuration file is the “server.xml“, kept under the $CATALINA_HOME\conf directory. The default “server.xml” is reproduced as follows (after removing the comments and some minor touch ups):
1 2 3 4 5 6 7 8 9 10 11 12 13 14 15 16 17 18 19 20 21 22 23 24 25 26 27 28 29 30 31 32 33 34 35 36 37 38 |
<?xml version='1.0' encoding='utf-8'?>
<Server port="8005" shutdown="SHUTDOWN">
<Listener className="org.apache.catalina.core.JasperListener" />
<Listener className="org.apache.catalina.core.AprLifecycleListener" SSLEngine="on" />
<Listener className="org.apache.catalina.core.JreMemoryLeakPreventionListener" />
<Listener className="org.apache.catalina.mbeans.GlobalResourcesLifecycleListener" />
<Listener className="org.apache.catalina.core.ThreadLocalLeakPreventionListener" />
<GlobalNamingResources>
  <Resource name="UserDatabase" auth="Container"
            type="org.apache.catalina.UserDatabase"
            description="User database that can be updated and saved"
            factory="org.apache.catalina.users.MemoryUserDatabaseFactory"
            pathname="conf/tomcat-users.xml" />
</GlobalNamingResources>
<Service name="Catalina">
<Connector port="8080" protocol="HTTP/1.1"
connectionTimeout="20000"
redirectPort="8443" />
<Connector port="8009" protocol="AJP/1.3" redirectPort="8443" />
<Engine name="Catalina" defaultHost="localhost">
<Realm className="org.apache.catalina.realm.LockOutRealm">
  <Realm className="org.apache.catalina.realm.UserDatabaseRealm" resourceName="UserDatabase"/>
</Realm>
<Host name="localhost" appBase="webapps"
unpackWARs="true" autoDeploy="true">
<Valve className="org.apache.catalina.valves.AccessLogValve" directory="logs"
prefix="localhost_access_log." suffix=".txt"
pattern="%h %l %u %t "%r" %s %b" />
</Host>
</Engine>
</Service>
</Server>
|
Server
Server (Line 2) is top component, representing an instance of Tomcat.It can contains one or more Services, each with its own Engines and Connectors.
<Server port="8005" shutdown="SHUTDOWN"> ...... </Server>
Listeners
The Server contains several Listeners (Lines 3-7). A Listener listens and responses to specific events.
- The
JasperListenerenables theJasperJSP engine, and is responsible for re-compiling the JSP pages that have been updated.<Listener className="org.apache.catalina.core.JasperListener" />
- The
GlobalResourcesLifecycleListenerenables the global resources, and makes possible the use of JNDI for accessing resources such as databases.<Listener className="org.apache.catalina.mbeans.GlobalResourcesLifecycleListener" />
Global Naming Resources
The <GlobalNamingResources> element (Line 9-15) defines the JNDI (Java Naming and Directory Interface) resources, that allows Java software clients to discover and look up data and objects via a name.
The default configuration defines a JNDI name called UserDatabase via the <Resource> element (Line 10-14), which is a memory-based database for user authentication loaded from “conf/tomcat-users.xml“.
<GlobalNamingResources>
<Resource name="UserDatabase" auth="Container"
type="org.apache.catalina.UserDatabase"
description="User database that can be updated and saved"
factory="org.apache.catalina.users.MemoryUserDatabaseFactory"
pathname="conf/tomcat-users.xml" />
</GlobalNamingResources>
You can define other global resource JNDI such as MySQL database to implement connection pooling.
Services
A Service associates one or more Connectors to a Engine. The default configuration defines a Service called “Catalina“, and associates two Connectors: HTTP and AJP to the Engine.
<Service name="Catalina"> ...... </Service>
Connectors
A Connector is associated with a TCP port to handle communications between the Service and the clients. The default configuration defines two Connectors:
- HTTP/1.1: Handle HTTP communication and enable Tomcat to be an HTTP server. Clients can issue HTTP requests to the server via this
Connector, and receive the HTTP response messages.<Connector port="8080" protocol="HTTP/1.1" connectionTimeout="20000" redirectPort="8443" />
The default chooses TCP port 8080 to run the Tomcat HTTP server, which is different from the default port number of 80 for HTTP production server. You can choose any number between 1024 to 65535, which is not used by any application, to run your Tomcat server.
TheconnectionTimeoutattribute define the number of milliseconds thisconnectorwill wait, after accepting a connection, for the request URI line (request message) to be presented. The default is 20 seconds.
Theredirectattribute re-directs the SSL requests to TCP port 8443. - AJP/1.3: Apache JServ Protocol
connectorto handle communication between Tomcat server and Apache HTTP server.<Connector port="8009" protocol="AJP/1.3" redirectPort="8443" />
You could run Tomcat and Apache HTTP servers together, and let the Apache HTTP server handles static requests and PHP; while Tomcat server handles the Java Servlet/JSP. Read “How To Configure Tomcat to work with Apache“.
Containers
Tomcat refers to Engine, Host, Context, and Cluster, as container. The highest-level is Engine; while the lowest-level is Context. Certain components, such as Realm and Valve, can be placed in a container.
Engine
A Engine is the highest-level of a container. It can contains one or more Hosts. You could configure a Tomcat server to run on several hostnames, known as virtual host.
<Engine name="Catalina" defaultHost="localhost">
The Catalina Engine receives HTTP requests from the HTTP connector, and direct them to the correct host based on the hostname/IP address in the request header.
Realm
A Realm is a database of user, password, and role for authentication (i.e., access control). You can define Realm for any container, such as Engine, Host, and Context, and Cluster.
<Realm className="org.apache.catalina.realm.LockOutRealm"> <Realm className="org.apache.catalina.realm.UserDatabaseRealm" resourceName="UserDatabase"/> </Realm>
The default configuration defines a Realm (UserDatabaseRealm) for the Catalina Engine, to perform user authentication for accessing this engine. It uses the JNDI name UserDatabase defined in the GlobalNamingResources.
Besides the UserDatabaseRealm, there are: JDBCRealm (for authenticating users to connect to a relational database via the JDBC driver); DataSourceRealm (to connect to a DataSource via JNDI; JNDIRealm (to connect to an LDAP directory); and MemoryRealm (to load an XML file in memory).
Hosts
A Host defines a virtual host under the Engine, which can in turn support many Contexts (webapps).
<Host name="localhost" appBase="webapps" unpackWARs="true" autoDeploy="true">
The default configuration define one host called localhost. The appBase attribute defines the base directory of all the webapps, in this case, $CATALINA_HOME\webapps. By default, each webapp’s URL is the same as its directory name. For example, the default Tomcat installation provides four webapps: docs, examples, host-manager and manager under the webapps directory. The only exception is ROOT, which is identified by an empty string. That is, its URL is http://localhost:8080/.
The unpackWARs specifies whether WAR-file dropped into the webapps directory shall be unzipped. For unpackWARs="false", Tomcat will run the application from the WAR-file directly, without unpacking, which could mean slower execution.
The autoDeploy attribute specifies whether to deploy application dropped into the webapps directory automatically.
Cluster
Tomcat supports server clustering. It can replicate sessions and context attributes across the clustered server. It can also deploy a WAR-file on all the cluster.
Valve
A Valve can intercept HTTP requests before forwarding them to the applications, for pre-processing the requests. A Valve can be defined for any container, such as Engine, Host, and Context, and Cluster.
In the default configuration, the AccessLogValve intercepts an HTTP request and creates a log entry in the log file, as follows:
<Valve className="org.apache.catalina.valves.AccessLogValve" directory="logs"
prefix="localhost_access_log." suffix=".txt"
pattern="%h %l %u %t "%r" %s %b" />
Other valves include:
RemoteAddrValve: which blocks requests from certain IP addresses,RemoteHostValve: which blocks request based on hostnames,RequestDumperValve: which logs details of the requests,SingleSignOnValve: when placed under a<host>, allows single sign-on to access all the webapp under the host.
Context (Application or Webapp)
A web context is a single web application (webapp). It is the lowest-level container, that you can define components such as Realm and Valve. By default, all webapps are kept under the $CATALINA_HOME\webapps directory (as configured in the <host> element appBase attribute.
A Java webapp may contain many types of files, such as HTML, CSS, Scripts, images, JSP, servlet, utility classes, external library jar-files. A Java webapp must follow a strict directory structure as depicted in the Servlet/JSP specifications. This enables deployment in a Java-capable web server (such as Apache Tomcat and Glassfish). The resources must be kept in the correct directories and sub-directories.
The URL of a webapp, by default, is the same as the base directory name (or context root) of the webapp.
Webapp’s Directory Structure
The directory structure of a webapp is as follows:

“ContextRoot“: contains the resources that are visible and accessible by the web clients, such as HTML, CSS, Scripts and images. These resources will be delivered to the clients as it is. You could create sub-directories such as images, css and scripts, to further categories the various resources.
- “
ContextRoot\WEB-INF“: This directory, although under the context root, is NOT visible to the web users. In other words, it is NOT accessible by the clients directly (for security reason). This is where you keep your application-specific configuration files such as “web.xml“. It’s sub-directories contain program classes, source files, and libraries. - “
ContextRoot\WEB-INF\src“: Keeps the Java program source files. It is optional but a good practice to separate the source files and classes to facilitate deployment. - “
ContextRoot\WEB-INF\classes“: Keeps the Java classes (compiled from the source codes). Classes defined in packages must be kept according to the Java package directory structure. - “
ContextRoot\WEB-INF\lib“: Keeps the libraries (jar-files), which are provided by other packages, specific and available to this webapp only. - “
ContextRoot\META-INF\“: This is also a hidden directory, to keep resources and configurations (e.g., “context.xml“) related to the server. In contrast, “WEB-INF” is for resources related to this web application, independent of the server.
Webapp-Specific Configuration Files
These are the configuration files specific to a webapp: (a) WEB-INF\web.xml; (b) META-INF\context.xml.
You can configure a webapp in many ways: (a) Write a <context> element in server.xml under <Host> element, (b) contextRoot\META-INF\context.xml, and (c) conf\Catalina\localhost\webapp.xml, and (d) conf\context.xml. See “Setting the Context Root Directory and Request URL of a Webapp“.
Tomcat’s Directory Structure
Tomcat installation provides these directories:
bin: for Tomcat’s binary codes.conf: global configuration applicable to all the webapps. The default installation provides:- One policy file:
catalina.policyfor specifying security policy. - Two properties files:
catalina.propertiesandlogging.properties, - Four configuration files:
server.xml(Tomcat main configuration file),web.xml(global web application deployment descriptors),context.xml(global Tomcat-specific configuration options) andtomcat-users.xml(a database of user, password and role for authentication and access control).
The
confalso contain a sub-directory for each engine, e.g.,Catalina, which in turn contains a sub-sub-directory for each of its hosts, e.g.,localhost. You can place the host-specific context information (similar tocontext.xml, but named aswebapp.xmlfor each webapp under the host).- One policy file:
lib: Keeps the JAR-file that are available to all webapps. The default installation includeservlet-api.jar,jasper.jar(JSP),jasper-el.jar(EL). You may also keep the MySQL JDBC driver (mysql-connector-java-5.1.xx-bin.jar), and JSTL (jstl.jarandstandard.jar) here.logs: contains the engine logfileCatalina.yyyy-mm-dd.log, host logfilelocalhost.yyyy-mm-dd.log, and other application logfiles such asmangerandhost-manager. The access log (created by theAccessLogValve) is also kept here.temp: temporary files used by Tomcat.webapps: the defaultappBase– web applications base directory of the hostlocalhost.work: contains the translated servlet source files and classes of JSP/JSF. Organized in hierarchy of engine name (Catalina), host name (localhost), webapp name, followed by the Java classes package structure.
Other Configuration Files: web.xml, context.xml, tomcat-users.xml
[TODO]
Some Configuration Options
They are so many things that you can configured in Tomcat. I describe some of the configurations that I found useful in this section.
Enabling Directory Listing
When the request URL refers to a directory instead of a file, e.g., http://host:port/hello/, you can configure Tomcat to serve the directory listing, or a welcome file, or issue error “404 Page Not Found”. Enabling directory listing is handy for test server but NOT desire for production server (as it reveal the directory structure and expose the entire directory hierarchy).
Enabling Directory Listing for ALL Webapps
To enable directory listing for all the web applications, you could modify the $CATALINA_HOME\conf\web.xml, by changing “listings” from “false” to “true” for the “default” servlet, as follows:
<!-- The default servlet for all web applications, that serves static     -->
<!-- resources.  It processes all requests that are not mapped to other   -->
<!-- servlets with servlet mappings.                                      -->
<servlet>
  <servlet-name>default</servlet-name>
  <servlet-class>org.apache.catalina.servlets.DefaultServlet</servlet-class>
  <init-param>
    <param-name>debug</param-name>
    <param-value>0</param-value>
  </init-param>
  <init-param>
    <param-name>listings</param-name>
    <param-value>true</param-value>
  </init-param>
  <load-on-startup>1</load-on-startup>
</servlet>

<!-- The mapping for the default servlet -->
<servlet-mapping>
  <servlet-name>default</servlet-name>
  <url-pattern>/</url-pattern>
</servlet-mapping>

<!-- ==================== Default Welcome File List ===================== -->
<!-- When a request URI refers to a directory, the default servlet looks  -->
<!-- for a "welcome file" within that directory and, if present,          -->
<!-- to the corresponding resource URI for display.  If no welcome file   -->
<!-- is present, the default servlet either serves a directory listing,   -->
<!-- or returns a 404 status, depending on how it is configured.          -->
<welcome-file-list>
  <welcome-file>index.html</welcome-file>
  <welcome-file>index.htm</welcome-file>
  <welcome-file>index.jsp</welcome-file>
</welcome-file-list>
The above configuration maps URL “\” (root directory of the web context) (in <url-pattern>) to Java class DefaultServlet (in <servlet-class>) via the common servlet name of default (in <servlet-name>). We enable directory listing by changing the servlet’s initialization parameter listings to true.
If a user requests for a directory, and the directory listing is enabled and it contains one of the files in the <welcome-file> list, the welcome file will be served; otherwise, the directory listing will be served. On the other hand, if a directory request is received and the directory listing is not enabled, the server returns an error “404 Page Not Found”.
Enabling Directory Listing for a particular Webapp
If you wish to allow directory listing of a particular web application only, you could disable the directory listing in “$CATALINA_HOME\conf\web.xml” globally, and define the following <servlet> and <servlet-mapping> in your application-specific WEB-INF\web.xml, as follows. You need to use another <servlet-name> in place of DefaultServlet.
<servlet>
  <servlet-name>DirectoryListing</servlet-name>
  <servlet-class>org.apache.catalina.servlets.DefaultServlet</servlet-class>
  <init-param>
    <param-name>debug</param-name>
    <param-value>0</param-value>
  </init-param>
  <init-param>
    <param-name>listings</param-name>
    <param-value>true</param-value>
  </init-param>
</servlet>

<servlet-mapping>
  <servlet-name>DirectoryListing</servlet-name>
  <url-pattern>/</url-pattern>
</servlet-mapping>
Automatic Servlet Reload
To enable automatic servlet reload (whenever a servlet is re-compiled), you need to specify <Context reloadable="true">...</Context>, in “$CATALINA_HOME\conf\context.xml” for all web applications, or the <Context> element in “$CATALINA_HOME\conf\server.xml” for a particular web application.
The following messages appear on the Tomcat’s console if you re-compile a servlet:
XXX X, XXXX XX:XX:XX XX org.apache.catalina.core.StandardContext reload
INFO: Reloading Context with path [/hello] has started
XXX X, XXXX XX:XX:XX XX org.apache.catalina.core.StandardContext reload
INFO: Reloading Context with path [/hello] is completed
Enabling automatic servlet reload is handy during application development, but it requires significant runtime overhead to listen to the changes, and is not recommended for production systems. Instead, you could use the “manager” to trigger reloads on demand.
Setting the Context Root Directory and Request URL of a Webapp
A server could run many web applications. A webapp is also called a web context. The context root (or document base directory) refers to the base directory of a webapp. They are a few ways to configure a context root and its request URL of a webapp:
- (RECOMMENDED) Create a directory under
$CATALINA_HOME\webappsfor your webapp. A context will be created with request URL set to the name of the directory. For example, if you create a directory called “hello” under Tomcat’s “webapps“. This application can be accessed by web users via URLhttp://host:port/hello.
To change the request URL of the webapp, create a “context.xml” configuration file, as follows, and place it under “ContextRoot\META-INF“:<Context path="/yourURLPath" />
- Alternatively, you can write a
<Context>element in$CATALINA_HOME\conf\server.xml, under the<Host>element. You can specify both the URL and the base directory. For example,...... ...... <Context path="/ws" docBase="d:/workshop" reloadable="true"> </Context> </Host> </Engine> </Service> </Server>In the above example, we define a web context with URL “
/ws“, with context root (docBaseor document base directory) at “d:\workshop“. This application can be accessed via URLhttp://host:port/ws.
Take note that:- The configuration creates a mapping from the “URL Path” issued by the web users to the “document base directory” in the server’s file system, where you store your webapp resources.
- Place the
<Context>element before the ending tag of the<Host>element. - Use Unix-style forward slash
'/'as the directory separator in the configuration file, instead of Window-style back slash'\'. - The attribute
reloadable="true"asks Tomcat to monitor your servlets for changes, and automatically reload the servlets if changes is detected. This is handy for a development system, but inefficient in a production system.
- Write a configuration file with a
<Context>element and place it under Tomcat’s “conf\Catalina\localhost“. For example, suppose we wish to create a webapp with URL “hello” in base directory “d:\myproject\myHello“, create the following file “hello.xml“:<?xml version="1.0" encoding="UTF-8"?> <Context docBase="D:\myproject\myHello" path="/hello" />
Changing the Default “webapps” Directory
The default directory for deploying web applications is $CATALINA_HOME\webapps. You could change the default by modifying the configuration file "conf\server.xml" <Host> element’s “appBase” attribute as follows:
<Host name="localhost" appBase="webapps"
      unpackWARs="true" autoDeploy="true"
      xmlValidation="false" xmlNamespaceAware="false">
   ......
</host>
Deploying a Web Application in a WAR file
You could use the JDK’s jar utility to “zip” up all the files of a web application to produce a so-called WAR (Web Application Archive) file for deployment, or distribution.
.... Change current directory to the web application's context root contextRoot> jar cvf test.war .
Drop the test.war into $CATALINA_HOME\webapps. A context called test will be created automatically. You can access the web application via URL http://host:port/test.
Tomcat actually unpacks the test.war into a “test” directory in $CATALINA_HOME\webapps. You need to remove this directory, if you reload a new version.
Running Tomcat as a Windows Service
This section is applicable for Windows. You need to download the Windows-specific version of Tomcat (from Tomcat’s download, choose 32-bit or 64-bit Window zip, e.g., apache-tomcat-7.0.2-windows-x86.zip).
Read “Windows service How-To” in the Tomcat documentation ($CATALINA_HOME\webapps\docs\windows-service-howto.html).
In a production environment, it is more convenient to run Tomcat as a service, so that it can start automatically whenever the system is started (or re-start automatically after an unexpected interruption).
To install Tomcat as a service, start a CMD shell (with administrator right) and run the $CATALINA_HOME\bin\service.bat with install option:
... Change directory to $CATALINA_HOME\bin ...
$CATALINA_HOME\bin> service install
Installing the service 'Tomcat7' ...
......
The service 'Tomcat7' has been installed.
The Tomcat service called “Apache Tomcat 7” is installed and will start automatically whenever the system is started. Check the “Services” under “Control Panel” ? “Administrative Tools”.
A GUI application called Tomcat7w is available for monitoring and configuring Tomcat services. Launch Tomcat7w:
$CATALINA_HOME\bin> Tomcat7w
You could put the Tomcat icon in the system tray via the MS (Monitor Service) option:
$CATALINA_HOME\bin> Tomcat7w //MS//
You can start/stop the Tomcat service now via:
Tomcat7w;- “Control Panel” ? “Administrator Tools” ? “Services” ? “Apache Tomcat 7” ? “Start”;
- From CMD shell, Issue “
net” command:prompt> net start tomcat7 The Apache Tomcat 7 service is starting.. The Apache Tomcat 7 service was started successfully. ...... ...... prompt> net stop tomcat7 The Apache Tomcat 7 service is stopping.. The Apache Tomcat 7 service was stopped successfully.
To uninstall Tomcat Service, run the $CATALINA_HOME\bin\service.bat with remove option:
$CATALINA_HOME\bin> service remove
The service 'Tomcat7' has been removed
A flip side of running Tomcat as a service is you need to read the error messages from $CATALINA_HOME\logs instead of the Tomcat console.
Tomcat’s Startup Script
To start tomcat server, you could invoke the batch file “startup.bat” (in directory “$CATALINA_HOME\bin“, where CATALINA_HOME refers to the Tomcat installed directory). The “startup.bat” invokes “catalina.bat start“.
Alternatively, you could call the “catalina.bat” directly, which provides more options of starting Tomcat. Enter “catalina” to view the options:
$CATALINA_HOME/bin> catalina
Using CATALINA_BASE:   D:\xxx\tomcat7.0.xx
Using CATALINA_HOME:   D:\xxx\tomcat7.0.xx
Using CATALINA_TMPDIR: D:\xxx\tomcat7.0.xx\temp
Using JRE_HOME:        d:\xxx\jdk1.6
Usage:  catalina ( commands ... )
commands:
  debug             Start Catalina in a debugger
  debug -security   Debug Catalina with a security manager
  jpda start        Start Catalina under JPDA debugger
  run               Start Catalina in the current window
  run -security     Start in the current window with security manager
  start Start Catalina in a separate window
  start -security   Start in a separate window with security manager
  stop              Stop Catalina
  version           What version of tomcat are you running?
Study the source codes of “Tomcat.bat” and “catalina.bat“, if interested. Read “Command Shell – How to” about the syntax of batch files. At times, I need to use these files (comment-out the “ECHO OFF“) to debug Tomcat’s startup problems.
Web Application Deployment Descriptors – “web.xml”
The “web.xml” contains the deployment descriptors. There are two sets of web.xml:
$CATALINA_HOME\conf\web.xml: applicable to ALL webapps.ContextRoot\WEB-INF\web.xml: applicable to the specific web context. It overrides the global setting, if any.
The complete specification for “web.xml” can be found in the “Java Servlet Specification” under “Deployment Descriptor”.
Tomcat’s Manager
Read “Apache Tomcat – Manager App HOW-TO” @ “webapps/docs/manager-howto.html”.
Tomcat webapp manager allows you to deploy a new web application; start, stop, reload or un-deploy an existing one, without having to shut down and restart the server.
To enable Tomcat manager, edit “$CATALINA_HOME\conf\tomcat-users.xml” to include a role called “manager” and a user with “manager” role.
<role rolename="manager"/>
<user username="tomcatmanager" password="xxxx" roles="manager,manager-script,admin"/>
Use http://localhost:8080/manager/html to invoke manager web application.
Tomcat with SSL
SSL, or Secure Socket Layer, allows web browsers and web servers to communicate over a secured connection. Tomcat provides built-in support for SSL. Before you attempt to turn on the SSL support, make sure that your tomcat is running fine for HTTP without SSL.
Read:
- “SSL Configuration How-to” of Tomcat Documentation @ “
$CATALINA_HOME\webapps\docs\ssl-howto.html“. - “keytool – Key and Certificate Management Tool” @ JDK documentation.
The steps to turn on SSL support are:
Step 1: Check your JDK version. Tomcat’s SSL uses Java Secure Socket Extension (JSSE), which has been integrated into JDK since 1.4.
Step 2: Prepare the Tomcat’s server certificate, using the JDK’s key and certificate management tool called “keytool” (in “$JAVA_HOME\bin” ), as follows:
> keytool
... display the help menu ...

> keytool -genkey -alias tomcat -keyalg RSA -keystore d:\tomcat\conf\.keystore
Enter keystore password: xxxxxxxx
Re-enter new password: xxxxxxxx
What is your first and last name?
  [Unknown]:
What is the name of your organizational unit?
  [Unknown]:
What is the name of your organization?
  [Unknown]:
What is the name of your City or Locality?
  [Unknown]:
What is the name of your State or Province?
  [Unknown]:
What is the two-letter country code for this unit?
  [Unknown]:
Is CN=Unknown, OU=Unknown, O=Unknown, L=Unknown, ST=Unknown, C=Unknown correct?
  [no]:  y
Enter key password for <tomcat>
        (RETURN if same as keystore password):
- The “
-genkey” option is used to generate a public-private key pair. The public key is wrapped into an X.509 v1 self-signed certificate. The certificate and the private key are stored in a new keystore entry identified by the alias. In our case, the alias name must be “tomcat“. - The “
-keyalg” option specifies the key generation algorithm. RSA public key algorithm is used in this case. - The “
-keystore” option specifies the name and location of the key store file. - The password for
<tomcat>must be the same as the keystore (i.e., hit enter for the last question).
Step 3: Enable SSL support for Tomcat. SSL is built into Tomcat. The Tomcat’s configuration file commented out the SSL configuration directive. Uncomment them by removing the <!-- and --> around the SSL Coyote HTTP/1.1 Connector as follows:
<!-- Define a SSL HTTP/1.1 Connector on port 8443
     This connector uses the JSSE configuration, when using APR, the
     connector should be using the OpenSSL style configuration
     described in the APR documentation -->
<Connector port="8443" protocol="org.apache.coyote.http11.Http11Protocol"
     SSLEnabled="true" maxThreads="150" scheme="https" secure="true"
     clientAuth="false" sslProtocol="TLS"
     keystoreFile="d:\tomcat\conf\.keystore"
     keystorePass="passwordOfKeyStore" />
Note that the SSL (or HTTPS) is running on port 8443 instead of its default port number 443.
Add in the keystoreFile and keyStorePass attributes. The keystoreFile attribute specified the location of the keystore file. The keyStorePass provides the password for accessing the keystore file.
Step 4: Start your tomcat (run “$CATALINA_HOME\bin\startup.bat“). After that, start a web browser and issue an HTTPS request as follows:
https://localhost:8443
User Authentication in Tomcat
Read Tomcat documentation “Realm Configuration HOW-TO” (@ “$CATALINA_HOME\webapps\docs\realm-howto.html“) and “Java EE 5 Tutorial”, Part IV “Services”, Chapters 28-30 on Security.
In Information Security:
- Access control deals with identifying which resources require protection, and which users (roles) are authorized to access the protected resources.
- Authentication deals with verifying users’ credential, i.e., ensuring the user is “who he said he is”. User’s credential is typically provided in the form of username/password. Other means include biometrics (finger-prints, retina) and digital certificates.
- Confidentiality deals with the encryption of the transmitted data over the network. This is often carried out via employing HTTP over SSL (Secure Socket Layer), known as HTTPS.
- Message Integrity: message is not tempered during transmission (via message digest or hash).
- Non-repudiation: If he/she has sent a message, he/she cannot deny (via public-key or digital certificate).
In Tomcat’s web applications, a user is identified via username/password. A user is assigned role(s) (e.g., manager, admin, user, etc). Tomcat grants access for web application to role(s), instead of individual users. A realm is a database or file, which contains user information such as username/password, and roles.
Tomcat supports the following types of realm:
UserDatabaseRealm: user information kept in a XML file “conf\tomcat-users.xml“, accessed via JDNI (Java Naming and Directory Interface).JDBCRealm: user information kept in a relational database such as MySQL, accessed via JDBC.- others.
You can used the <realm> element to configure a realm in “conf\server.xml“. <realm> element can be placed in <engine>, <host>, or <context>, which determines the scope of the <realm> – all virtual hosts under the engine, a particular host, or a particular web application.
“Declarative security” is handled by the server. The server-side programs (servlets, JSPs) do not need any security-aware code. That is, the security control is totally transparent to the server-side programs.
UserDatabaseRealm
UserDatabaseRealm stores user information in a XML file and accessed via JNDI. By default, the XML file is “$CATALINA_HOME\conf\tomcat-users.xml“.
Tomcat provide a JSP example to configure UserDatabaseRealm in “WEB-INF\examples\jsp\security\protected“, accessed via http://localhost:8080/examples/jsp/security/protected/index.jsp”. Let us study this example.
“conf\server.xml“
Tomcat enables UserDatabaseRealm, in default installation, with the following configuration directives in “server.xml“. It defines a JDNI named “UserDatabase” to the file “conf\tomcat-users.xml“. The UserdatabaseRealm is defined within the <Engine> elements, and thus applicable to all the virtual hosts and web applications, under this server.
<Server ...... >
  <!-- Global JNDI resources -->
  <GlobalNamingResources>
    <!-- Editable user database that can also be used by
         UserDatabaseRealm to authenticate users -->
    <Resource name="UserDatabase" auth="Container"
              type="org.apache.catalina.UserDatabase"
              description="User database that can be updated and saved"
              factory="org.apache.catalina.users.MemoryUserDatabaseFactory"
              pathname="conf/tomcat-users.xml" />
  </GlobalNamingResources>

  <Service name="Catalina">
    <Engine name="Catalina" defaultHost="localhost">
      <!-- This Realm uses the UserDatabase configured in the global JNDI
           resources under the key "UserDatabase".  Any edits
           that are performed against this UserDatabase are immediately
           available for use by the Realm.  -->
      <Realm className="org.apache.catalina.realm.UserDatabaseRealm"
             resourceName="UserDatabase" />
      <Host name="localhost" ......
        ......
      </Host>
    </Engine>
  </Service>
</Server>
“conf\tomcat-users.xml“
Recall that a user is identified via username/password. A user is assigned role(s). Accesses for web applications are granted to role(s) instead of individual users. “Tomcat-users.xml” contains the following roles and username/password, but commented-out. Uncomment them for testing the example.
<?xml version="1.0" encoding="ISO-8859-1" ?>
<tomcat-users>
  <role rolename="tomcat" />
  <role rolename="role1" />
  <user username="tomcat" password="tomcat" roles="tomcat" />
  <user username="both" password="tomcat" roles="tomcat,role1" />
  <user username="role1" password="tomcat" roles="role1" />
</tomcat-users>
“ContextRoot\WEB-INF\web.xml“
For the “examples” web context, the security roles are defined using <security-constraint> element in “examples\WEB-INF\web.xml” as follows. The URL pattern /jsp/security/protected/* (GET, POST, DELETE, PUT methods) are accessible by users having roles of tomcat and role1 only.
<web-app ......>
  ......
  <security-constraint>
    <display-name>Example Security Constraint</display-name>
    <web-resource-collection>
      <web-resource-name>Protected Area</web-resource-name>
      <!-- Define the context-relative URL(s) to be protected -->
      <url-pattern>/jsp/security/protected/*</url-pattern>
      <!-- If you list http methods, only those methods are protected -->
      <http-method>DELETE</http-method>
      <http-method>GET</http-method>
      <http-method>POST</http-method>
      <http-method>PUT</http-method>
    </web-resource-collection>
    <auth-constraint>
      <!-- Anyone with one of the listed roles may access this area -->
      <role-name>tomcat</role-name>
      <role-name>role1</role-name>
    </auth-constraint>
  </security-constraint>

  <!-- Default login configuration uses form-based authentication -->
  <login-config>
    <auth-method>FORM</auth-method>
    <realm-name>Example Form-Based Authentication Area</realm-name>
    <form-login-config>
      <form-login-page>/jsp/security/protected/login.jsp</form-login-page>
      <form-error-page>/jsp/security/protected/error.jsp</form-error-page>
    </form-login-config>
  </login-config>

  <!-- Security roles referenced by this web application -->
  <security-role>
    <role-name>role1</role-name>
  </security-role>
  <security-role>
    <role-name>tomcat</role-name>
  </security-role>
Form-based Authentication Method
The above example uses FORM-based authentication method, defined in element <login-config>. All accesses to the protected URL (http://localhost:8080/examples/jsp/security/protected/*) will be redirected to the login.jsp page (defined in <form-login-page>), which prompts user for the credential. For example, if a user requests for http://localhost:8080/examples/jsp/security/protected/index.jsp, the login.jsp will be displayed.
The login.jsp page shall contain a html <form> (thus called Form-based authentication):
<html>
<head><title>Login Page for Examples</title></head>
<body>
<form method="POST" action='<%= response.encodeURL("j_security_check") %>' >
  Username:<input type="text" name="j_username">
  Password:<input type="password" name="j_password">
  <input type="submit" value="Log In">
</form>
</body>
</html>
The login page shall submit the username and password in parameters j_username and j_password to j_security_check. You should use <input type="password" ...> for the password text field, which will display the password as *’s. The response.encodeURL(URL) encodes the specified URL by including the session ID if URL-rewriting is used for session tracking; it returns the URL unchanged if cookie is used. For robust session tracking, all URLs emitted by server-side programs (servlet/JSP) should be run through this method.
If login fails, user will be redirected to error.jsp page, for example,
<html>
<head><title>Error Page For Examples</title></head>
<body>
Invalid username and/or password, please try again
<a href='<%= response.encodeURL("index.jsp") %>'>again</a>.
</body>
</html>
If login succeeds, the user will get the page he requested for. Study the “examples\jsp\security\protected\index.jsp” source.
- To logoff, terminate the current session via
session.invalidate(). - You can use
request.getRemoteUser()to get the authenticated login username;request.getUserPrincipal()to get ajava.security.Principalobject containing the name of the current authenticated user;request.isUserInRole(role)to check if the authenticated user is included in the specifiedrole.
HTTPS
The username and password send in form data are in clear text, and susceptible to eavesdropping. Hence, it is important to encrypt the transport by turning on SSL (HTTPS). Read “Tomcat with SSL” on how to setup Tomcat with SSL.
To enforce user to use secure transport (HTTPS), add a <transport-guarantee>CONFIDENTIAL</transport-guarantee>, inside the <security-constraint>, as follows:
<security-constraint>
  <display-name>Example Security Constraint</display-name>
  <web-resource-collection>
    <web-resource-name>Protected Area</web-resource-name>
    <url-pattern>/jsp/security/protected/*</url-pattern>
    ......
  </web-resource-collection>
  <auth-constraint>
    <role-name>tomcat</role-name>
    ......
  </auth-constraint>
  <!-- must use SSL for secure transport -->
  <user-data-constraint> <transport-guarantee>CONFIDENTIAL</transport-guarantee> </user-data-constraint>
</security-constraint>
All accesses to http at port 8080 (e.g., http://localhost:8080/examples/jsp/security/protected/index.jsp) will be redirected to https at port 8443 (e.g., https://localhost:8443/examples/jsp/security/protected/index.jsp).
HTTP Basic Authentication
Other than Form-based authentication, you could use the Basic Authentication Scheme available in HTTP server to authenticate user. Change the <login-config>‘s <auth-method> to BASIC, instead of FORM.
<login-config>
   <auth-method>BASIC</auth-method>
   <realm-name>Example Basic Authentication Area</realm-name>
</login-config>
Again, Basic Authentication sends the username and password in clear text. It is totally insecure, unless you should use a secure transport (HTTPS).
HTTP Digest Authentication
Tomcat also support HTTP Digest Authentication Scheme to authenticate user. Change the <login-config>‘s <auth-method> to DIGEST. Instead of sending password in clear text, the digest of password is send to the server. Digest authentication is more secure.
<login-config>
   <auth-method>BASIC</auth-method>
   <realm-name>Example Basic Authentication Area</realm-name>
</login-config>
JDBCRealm
In JDBCRealm, user information kept in a relational database such as MySQL, accessed via JDBC.
Setting up Database
We shall set up our user database in MySQL. Read “How to install MySQL“.
The following script can be used to set up the user database. Two tables are required: a users table containing username and password, and a user_roles containing username and the role assigned.
create database tomcat_users;

use tomcat_users;

create table users (
  username varchar(15) not null primary key,
  password varchar(15) not null
);

create table user_roles (
  username varchar(15) not null,
  role     varchar(15) not null,
  primary key (username, role)
);

insert into users values
  ('tomcat', 'tomcat'),
  ('both', 'tomcat'),
  ('role1', 'tomcat');

insert into user_roles values
  ('tomcat', 'tomcat'),
  ('role1', 'role1'),
  ('both', 'tomcat'),
  ('both', 'role1');
JDBC Driver
Next, copy the MySQL’s JDBC driver (“mysql-connector-java-5.1.xx-bin.jar“) into Tomcat’s lib (“$CATALINA_HOME\lib“).
“conf\server.xml“
<Realm className="org.apache.catalina.realm.JDBCRealm" debug="99" driverName="com.mysql.jdbc.Driver" connectionURL="jdbc:mysql://localhost/tomcat_users?user=dbuser&password=dbpass" userTable="users" userNameCol="username" userCredCol="password" userRoleTable="user_roles" roleNameCol="role" />
“ContextRoot\WEB-INF\web.xml“
Same as UserDatabaseRealm.
Authentication Methods
Same as UserDatabaseRealm, you can use FORM, BASIC or DIGEST authentication method.
Testing
You need to start MySQL server before starting the Tomcat Server.
Setting up Database Connection Pooling in Tomcat
Read “Database Connection Pooling in Tomcat with MySQL“.
Configuring Virtual Hosts
To set up a virtual host called “www.mytest.com” (suppose that you have registered this hostname with at static IP address). Include the following <Host> element in server.xml under the Engine Catalina:
<Engine name="Catalina" >
<Host name="localhost .....>
......
</Host>
<Host name="www.mytest.com" appBase="webapps_mytest.com" unpackWARs="true" autoDeploy="true" > <Alias>mytest.com</Alias> <Valve className="org.apache.catalina.valves.AccessLogValve" directory="logs" prefix="mytest.com_access_log." suffix=".log" pattern="%h %l %u %t "%r" %s %b" resolveHosts="false" /> </Host>
</Engine>
The above lines configure a virtual host with hostname “www.mytest.com“, with webapps base directory at “$CATALINA_HOME\webapps_mytest.com“. We also define a alias called “mytest.com“. That is, this host can be accessed via http://www.mytest.com:port or http://mytest.com:port. We also define a Valve, which intercepts the request message to write a log entries (similar to localhost).
Next:
- Create a directory “
webapps_mytest.com” under$CATALINA_HOME, according to theappBase. - Create a web application called
ROOT, by creating a directoryROOTunder the “webapps_mytest.com“. Recall thatROOTwas configured with an empty string URL. In other words,http://www.mytest.com:port/accesses theROOTapplication. - Create a directory “
www.mytest.com” under “conf\Catalina“. - Write a welcome page called “
index.html” and save it in “webapps_mytest.com\ROOT“.<html> <head><title>Testing Virtual Host</title></head> <body> <h1>It's work on virtual host</h1> </body> </html>
To test the virtual host, without registering the hostname with an ISP, edit “C:\Windows\System32\drivers\etc\hosts” to include the following lines (required administrative authority):
127.0.0.1   www.mytest.com
127.0.0.1   mytest.com
These lines maps host names www.mytest.com and mytest.com to IP address 127.0.0.1, which is the localhost. As the IP software checks the host file before asking Domain Name Service (DNS) to resolve a host name, you willl be able to test your virtual host.
Now, you are ready to test the virtual hosts. Start the Tomcat server and issue these URL:
http://www.mytest.com:8080
http://mytest.com:8080
http://www.mytest.com:8080/
http://mytest.com:8080/
http://www.mytest.com:8080/index.html
http://mytest.com:8080/index.html
REFERENCES & RESOURCES
- Tomcat mother site @ http://tomcat.apache.org
- Tomcat’s Documentation @ “
$CATALINA_HOME\webapps\docs“. - Java Servlet, JavaServer Pages (JSP), and JavaServer Faces (JSF) specifications.
Recent Comments